These days, there is quite a bit of info on the internet about how to make a 327i, a 328i, or a 330i M20 stroker motor using a 325e block, a 325i cylinder head, some piston magic, and probably 30 psi of turbo boost.
However, back in the early 2000s there was zero information on the internet about this mythical engine conversion. The few who did the conversion kept quiet and refused to share their knowledge, thus keeping alive the rumors and vague theories on how to turn a mundane 325e into a high power 327i.
So when I built my M20 stroker engine back in December 2002, I decided to document my research and efforts to debunk myths and share fundamental knowledge with you, the internet.
The information below was the first E to I conversion documented on the internet. It was originally written in January 2003 and updated in August 2020.
FAQ
1.) What is the E to I Conversion?
It’s the concept of making a hybrid high horsepower, high torque motor with a flat powerband using the top half of a 325i and the bottom block of a 325e. The idea is to obtain the high end power of a 325i and the low end grunt of a 325e using mostly factory parts.
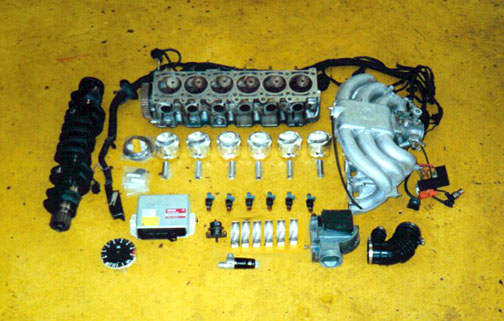
2.) What parts are needed?
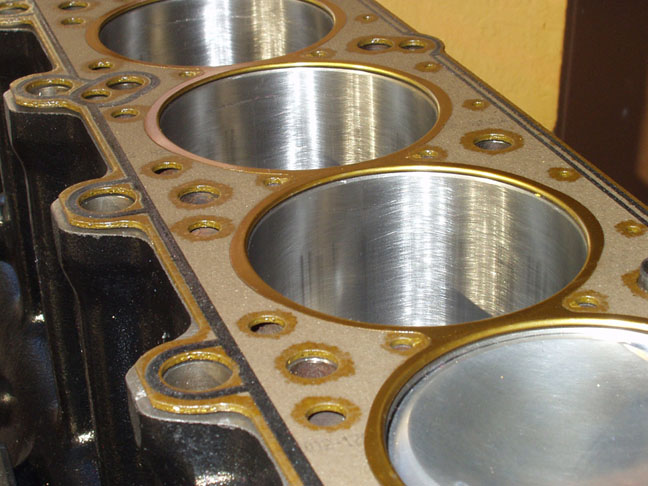
Generally speaking, for an 84-87 325e you need the entire fuel injection system from a 325i as well as the intake manifold, throttle body, and complete cylinder head with cam, valves, and dual valve springs. However, the stock 325e pistons will not work with the 325i head because of the different design – the 325i has a domed cylinder chamber to match the domed pistons while the eta has a flat cylinder chamber to match the flat pistons. Throw the flat 325e pistons into a 325i head and (according to Jim Rowe of Metric Mechanic) you’ll have a mismatch that causes a lower compression ratio, and this for this procedure lower compression is a bad thing. So that leaves you with 3 choices:
- #1 is to use the pistons from a 1988 325 or 528e (Super Eta), which works fine but has a less than ideal compression ratio of 8.8:1. The good thing is that they are cheap if you can find them, but then again, they are used pistons and aren’t very commonplace since they were only available for one model year. However, if you have a 1988 325 or 528e then you’re off to a good start.
- #2 is to use the 325i pistons. With the eta crankshaft, this will result in the piston sitting 2mm higher than normal at TDC, which will bend the valves, so you’ll also have to use shorter connecting rods, such as the ones from an M20 320i (and possibly deck the block, which will then result in incorrect valve timing so you’ll need an adjustable cam gear to compensate). Or instead of using shorter connecting rods, you may be able to shave the top of the piston. 2 or 3mm is the accepted tolerance with stock 325i rods. Pete McHenry of Precision Performance Services in Winston-Salem, North Carolina is the pioneer of this conversion and would know this information firsthand, as would Jim Rowe of Metric Mechanic in Richland, Missouri. This is my least preferred method, as there are too many compromises and unnecessary variables introduced.
- #3 is to order a set of custom pistons from companies such as JE or Arias. While this is probably the most expensive route, you can customize exactly what type, compression, and size of piston you want. This is my preferred route and also the only way to get a 2.8 liter (or larger) displacement. Custom M20 pistons can be ordered through a variety of vendors, such as Top End Performance or Ireland Engineering.
3.) If I need the entire top half of a 325i, wouldn’t it be easier if I started off with a 325i and throw on an eta crankshaft and some custom pistons?
Yes, but what’s the fun in that?
4.) How much is this going to cost me?
Again, for a detailed list see below, but figure at least $2,500 to $3,500 in parts alone depending on where you’re starting. If you shop around and buy some of the parts used and in good condition, you can save yourself a lot of cash. I did much of the labor myself (except the machine work), but if you’re handing your car over to a specialist then throw in at least another grand in labor. Also, if you have the entire engine out you may as well change other parts such as the head gasket, timing belt, tensioner, water pump, front/rear engine seals, etc, which is obviously going to cost a few more bucks. Altogether, including machine work, I spent around $3,600 back in 2002, so that’s about $10,000 in today’s money.
5.) That’s a lot of money. Doesn’t Ireland Engineering sell a stroker kit for less than $2,000?
Hey, nobody ever said power was cheap. Yes, Ireland does sell a 2.9 stroker kit for around $1,750, but it is meant to be used with an existing 325i motor. It doesn’t include things such as an intake manifold, fuel injectors, cylinder head, camshaft, wiring harness, or ECU. But if you are starting with a 325i, it may be a good choice.
6.) What about the 1988 325/528e “Super Eta”? I hear those are better for the conversion than the 1984-1987 etas.
That’s true because the 1988 325 and 528e already have the 325i cylinder head (though it retains the eta cam and single valve springs), Motronic 1.1, and pistons that will work without any modification. Saves some time and money.
7.) An eta is 2.7 liters. How do I get a 2.8 out of that?
The stock 325e engine displacement is 2693cc and the stock piston bore size is 84 mm. Order custom pistons and specify them to be 1mm overbore (so they are 85 mm) and that will give you a displacement of 2758 cc, which rounds up to 2.8 liters. Going even larger to an 86mm bore would also net a 2.8 liter displacement (2823 cc).
8.) How much power are we talking?
Highly dependent on the setup. It’s tough to talk straight numbers because there is so much variance between engines in terms of modifications, but figure that a conservative 2.7 liter setup with 1988 325 pistons and stock 325i fuel injection, cam, and exhaust may yield around 180 horsepower and 190 lb-ft of torque at the crankshaft. Something a little more aggressive, such as a 2.8 liter with custom high compression pistons, larger air flow meter, larger injectors, 524td crankshaft, and mild cam may put out around 205 crank horsepower. Engines that are wildly tuned with a 2.9/3.0/3.2 displacement, mass air conversion, hot cam, open headers, bored throttle body with ported manifold, ported cylinder head with oversize valves, etc will put out more than 220 horsepower, but don’t expect to get any insane numbers out of the M20 motor. The important thing here is not so much the raw horsepower numbers but the horsepower and torque curves. On a stock 325i both curves are peaked towards higher RPM, while on a stroker they are not only higher but flatter.
9.) I want more power. Isn’t it a better value to swap in an M50, S50, or S54 engine?
Possibly. You can also swap in a Chevy LS1 V8 for even more power, but doing any of that defeats the purpose of having an engine that is true to the original character of the car and the era, which is what this is all about.
10.) I live in California. Will the car pass smog?
I did, and you will too if you have a conservative setup that mimics factory specifications. But if you have other mods, such as a hotter cam, then likely not.
11.) What about gas mileage?
Gas mileage will drop though exactly how much depends on your setup and how you drive. I used to average about 24.5 mpg in my eta and now I average about 20 mpg with the 2.8i. However, on a 300 mile all-highway trip, I averaged 28.5 mpg at a steady 75 mph. But if you’re that concerned about fuel economy, then you wouldn’t be reading this right now, would you?
12.) What else needs to be modified when doing the conversion?
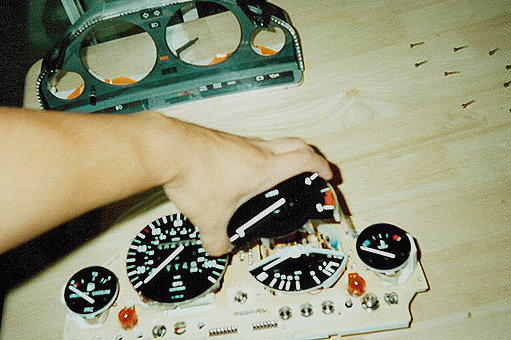
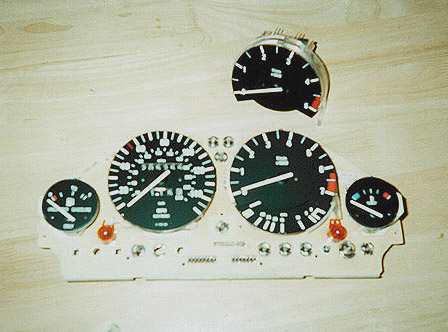
A shorter (numerically higher) differential is also recommended since the end result will be a 325i stroker motor, and the 325i came with a 3.73:1 differential. Either a 318i or 325i 7000 RPM tachometer needs to be fitted, and for optimal flow you should add the dual-pipe 325i exhaust system. Of course, stickier tires and good brakes are also a good idea.
Parts List
This is the general parts list using a 1984-1987 325e as a baseline. I used to have the prices for both new and used parts, but it’s from 2003 so likely not accurate anymore. And other than the custom pistons, aftermarket parts (cam, fuel pressure regulator, injectors, mass air sensor, etc), are not listed, so the following parts are all factory issue.
“M” is mandatory – the part is absolutely necessary for the conversion.
“MT” is maintenance – the part is a wear and tear item that should be replaced if old or worn.
“O” is optional – the part could be replaced while everything is out, but isn’t necessary to do so.
“U” is upgrade – the part is a factory upgrade over a stock eta.
SHORT BLOCK
| PART | PART NUMBER | SOURCE | USE |
|---|---|---|---|
| Belt, air conditioning | 64-52-1-466-043 | E30 325i or 325e | MT |
| Belt, power steering | 32-42-1-706-825 | E30 325i or 325e | MT |
| Belt, water pump | 11-51-1-706-710 | E30 325i or 325e | MT |
| Connecting rod set | 11-24-1-284-849 upper 11-24-1-284-850 lower | E36 M31 | U |
| Crankshaft, forged | 11-21-2-242-002 | E28 524td2 | U |
| Crankshaft front seal, small | 11-12-1-285-609 | E30 325i or 325e | MT |
| Crankshaft front seal, large | 11-14-1-275-466 | E30 325i or 325e | MT |
| Crankshaft rear seal | 11-14-1-706-785 | E30 325i or 325e | MT |
| Crankshaft rear metal gasket | 11-14-1-432-240 | E30 325i or 325e | MT |
| Engine mount | 11-81-1-132-323 | E30 325i or 325e | MT |
| Main bearing set | 11-21-1-706-849 | E30 325e | MT |
| Oil filter | 11-42-1-266-773 | E30 325i or 325e | MT |
| Oil pan gasket | 11-13-1-730-234 | E30 325i or 325e | MT |
| Oil pressure switch | 12-61-1-730-160 | E30 325i | MT |
| Oil pump | 11-41-1-720-898 | E30 325i or 325e | O |
| Pistons, high comp, +1mm overbore | N/A | Aftermarket | M |
| Timing cover (lower) gasket | 11-14-1-720-903 | E30 325i or 325e | MT |
1: The S52 connecting rod from the 1996-1999 E36 M3 connecting rod is 100g lighter than the 325e connecting rod and has the same 135mm length
2: The 524td crankshaft has an identical 81mm stroke as the 325e crankshaft but is forged vs. cast, making it stronger but heavier (24.5 kg vs 23 kg, or 54 lbs vs 50.7 lbs).
CYLINDER HEAD
| PART | PART NUMBER | SOURCE | USE |
|---|---|---|---|
| Cylinder head, complete | 11-12-1-707-032 | E30 325i | M |
| if not complete: | |||
| Camshaft | 11-31-1-716-738 | E30 325i | M |
| Camshaft seal, upper | 11-12-1-285-609 | E30 325i | M |
| Camshaft seal, lower | 11-12-1-276-518 | E30 325i | M |
| Rocker arm | 11-33-1-271-429 | E30 325i or 325e | M |
| Rocker arm eccentric washer | 11-33-1-744-354 | E30 325i or 325e | M |
| Rocker shaft seals | 11-33-1-264-519 | E30 325i or 325e | M |
| Valve, exhaust | 11-34-1-708-896 | E30 325i | M |
| Valve, intake | 11-34-1-708-895 | E30 325i | M |
| Valve spring, 30.2mm | 11-34-1-706-583 | E30 325i | M |
| Valve spring, 20.1mm | 11-34-1-706-584 | E30 325i | M |
| Head bolt set, torx3 | 11-12-1-726-478 | E30 325i or 325e | M |
| Head gasket | 11-12-1-722-734 | E30 325i | MT |
| Timing belt | 11-31-1-469-240 | E30 325i or 325e | MT |
| Timing belt tensioner | 11-31-1-468-743 | E30 325i or 325e | MT |
| Valve cover | 11-12-1-713-116 | E30 325i | U |
| Valve cover breather hose | 11-15-1-708-801 | E30 325i | MT |
| Valve cover gasket | 11-12-1-730-229 | E30 325i or 325e | MT |
3: If your car has the older style hex headbolts, replace them with the torx because the hex bolts do not expand as well at high temperatures
FUEL INJECTION & INTAKE SYSTEM
| PART | PART NUMBER | SOURCE | USE |
|---|---|---|---|
| Air flow meter | 13-62-1-286-615 | E30 325i | M |
| Air flow meter boot | 13-71-1-708-800 | E30 325i | M |
| ECU (Motronic 1.3) | 12-14-1-730-5274 | E30 325i | M |
| Fuel filter | 13-32-1-270-038 | E30 325i or 325e | MT |
| Fuel injection wiring harness | 5 | E30 325i | M |
| Fuel injector | 13-64-1-734-776 | E30 325i | M |
| Fuel injector | 13-64-1-726-9886 | E28 535i | U |
| Fuel injector | 13-64-1-730-0606 | E36 325i or 323i | U |
| Fuel injector o-ring | 13-64-1-730-7677 | Any | MT |
| Fuel injector rail | 13-53-1-719-981 | E30 325i | M |
| Fuel pressure regulator (3.0 bar) | 13-53-1-722-040 | E30 325i | M |
| Idle control valve | 13-41-1-433-6268 | E30 325i | M |
| Idle control valve hose | 13-41-1-718-777 | E30 325i | M |
| Intake manifold | 11-61-1-289-210 | E30 325i | M |
| Intake manifold gasket (large) | 11-61-1-726-012 | E30 325i | M |
| Intake manifold gasket (small) | 11-61-1-726-010 | E30 325i | M |
| Intake manifold support plate | 11-61-1-708-838 | E30 325i | M |
| Throttle body | 13-54-1-716-0659 | E30 325i | M |
| Throttle body gasket | 13-54-1-289-576 | E30 325i | M |
| Throttle body dual vacuum hose | 34-33-1-158-113 | E30 325i | M |
| Throttle position switch | 13-63-1-710-559 | E30 325i | M |
4: Any ECU with the Bosch number 0-261-200-173, 0-261-200-380, 0-261-200-524, or 0-261-200-525 will work. The ECU 0-261-200-153 is Motronic 1.1 and will also work but is an older version of Motronic and generally has the least amount of aftermarket software support, therefore isn’t recommended.
5: There are many wiring harnesses available: The ones for the 87, 88, and 89-91 all have different part numbers but are more or less the same except for the oxygen sensor connection and the fuel injector rail – the earlier models connected directly to the injectors while the later ones had a separate rail that connected the wiring harness to the injector rail.
6: The injectors from the E28 535i and the E36 325i/323i are upgrades to the E30 325i because of their higher flow rate. They are a direct bolt on and are recommended since the 325i injectors tend to lean out at high RPM. But be warned that your OBC AVG MPG and RANGE features may not be as accurate with the different injectors.
7: Can also be used for the fuel pressure regulator o-ring as well.
8: There are two idle control valves for the 325i, an L-shaped unit and a T-shaped unit. Both work fine and function the same.
9: Throttle bodies from cars built after 1989 had dual vacuum lines that went to the brake booster. The ones before 89 had a single line.
EXHAUST SYSTEM
| PART | PART NUMBER | SOURCE | USE |
|---|---|---|---|
| Catalytic converter | 11-76-1-716-743 | E30 325i | U |
| Exhaust manifold, front | 11-62-1-710-834 | E30 325i | U |
| Exhaust manifold, rear | 11-62-1-710-825 | E30 325i | U |
| Exhaust manifold gasket | 11-62-1-728-489 | E30 325i or 325e | MT |
| Muffler | 18-10-1-705-783 | E30 325i | U |
| Muffler hanger kit | N/A | E30 325i | M |
| Oxygen sensor | 11-78-1-716-11410 | E30 325i | M |
10: The oxygen sensor must be from the same year as the wiring harness. If the wiring harness is from a 91, then use a 91 O2 sensor. If it’s from an 87, then use an 87 O2 sensor..
ELECTRICAL SYSTEM
| PART | PART NUMBER | SOURCE | USE |
|---|---|---|---|
| Alternator, 90A | 12-31-1-726-603 11 | E30 325i | M |
| Distributor cap | 12-11-1-725-070 | E30 325i or 325e | MT |
| Distributor rotor | 12-11-1-734-110 | E30 325i or 325e | MT |
| Ignition wire set | 12-12-1-720-529 | E30 325i | M |
| Reference sensor | 12-14-1-720-852 | E30 325i | M |
| Spark plug | W8LCR | E30 325i | M |
11: The 325e’s 80 amp alternator bolts right up, but I recommend using the 325i’s 90 amp alternator because it can handle the 325i’s higher load.
COOLING SYSTEM12
| PART | PART NUMBER | SOURCE | USE |
|---|---|---|---|
| Hose, expansion tank vent | 17-12-1-119-294 | E30 325i or 325e | MT |
| Hose, expansion tank to water pump | 11-53-1-289-257 | E30 325i | MT |
| Hose, heater outlet to water pump | 11-53-1-289-377 | E30 325i | MT |
| Hose, junction at throttle body | 13-54-1-289-976 | E30 325i | MT |
| Hose, radiator to thermostat housing | 11-53-1-279-895 | E30 325i | MT |
| Hose, radiator to thermostat housing | 11-53-1-286-914 | E30 325i | MT |
| Hose, thermostat to water pump | 11-53-1-287-651 | E30 325i | MT |
| Hose, thermostat housing to throttle housing | 13-54-1-705-568 | E30 325i | MT |
| Hose, water pump outlet to heater | 64-21-1-380-527 | E30 325i | MT |
| Temperature sensor, engine coolant | 12-62-1-710-512 | E30 325i | M |
| Temperature sensor, water | 13-62-1-357-414 | E30 325i | M |
| Thermostat | 11-53-1-466-174 | E30 325i or 325e | MT |
| Thermostat housing | 11-53-1-730-470 | E30 325i or 325e | MT |
| Thermostat housing gasket | 11-53-1-722-692 | E30 325i or 325e | MT |
| Water pump | 11-51-9-071-562 | E30 325i or 325e | MT |
12: If you have a 1984-1987 325e, use the cooling system and hoses from a 1987 325i because everything changed in 1988
MISCELLANEOUS
| PART | PART NUMBER | SOURCE | USE |
|---|---|---|---|
| Differential, 3.73:1 LSD | 33-10-1-211-961 | E30 325is | U |
| Brake booster | 34-33-1-157-416 | E30 325i | O |
| Tachometer, 7000 RPM | 62-13-1-377-353 13 | E30 325i, E30 M10 3i8i | M |
| Emblem, 328i | 51-14-8-170-187 | E36 328i | U |
13: For cars made before 1/86 with a coding plug, use a 1984-1985 318i tachometer. For cars made 1/86 or later with a coding chip, use an 1987-1991 325i tachometer.
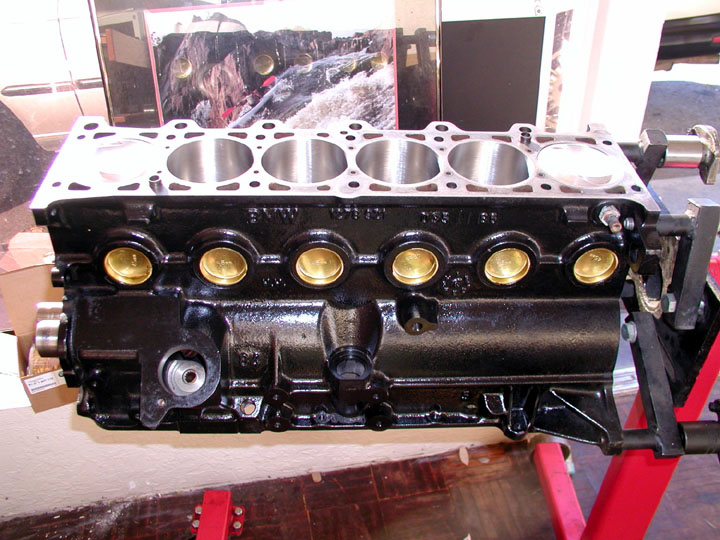
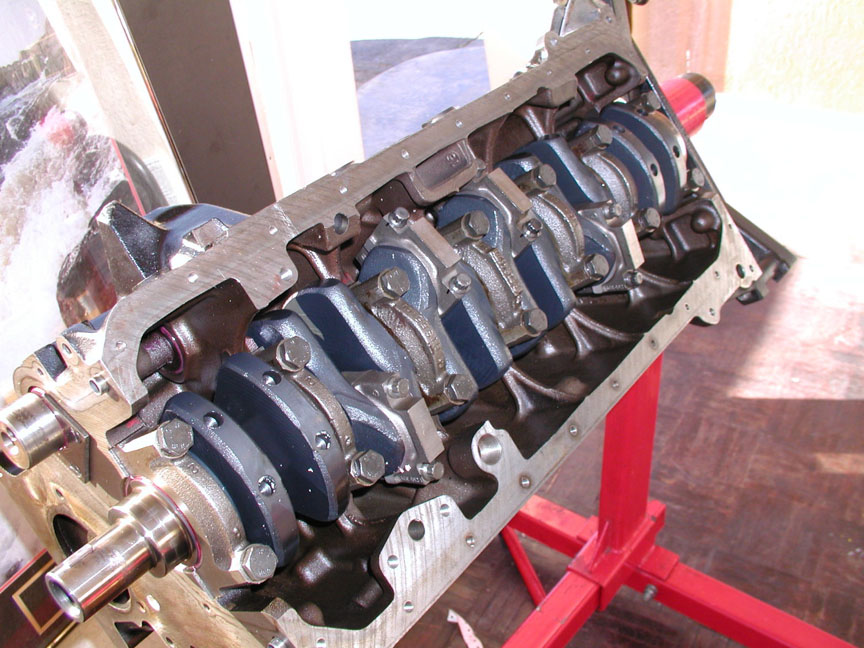
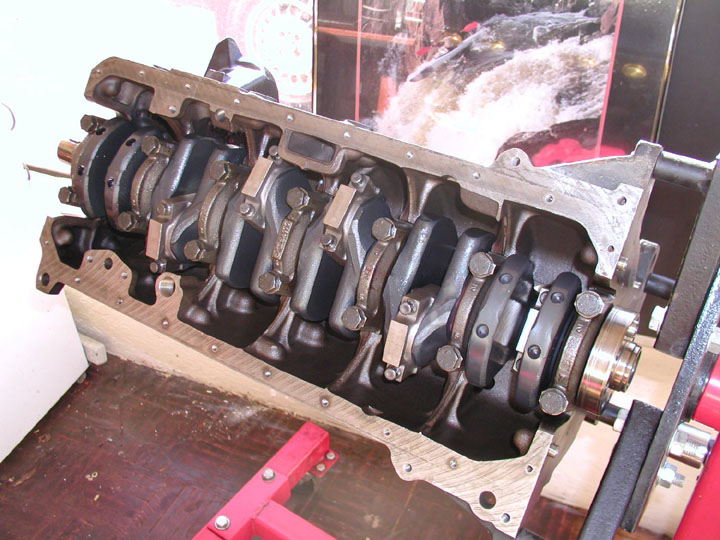
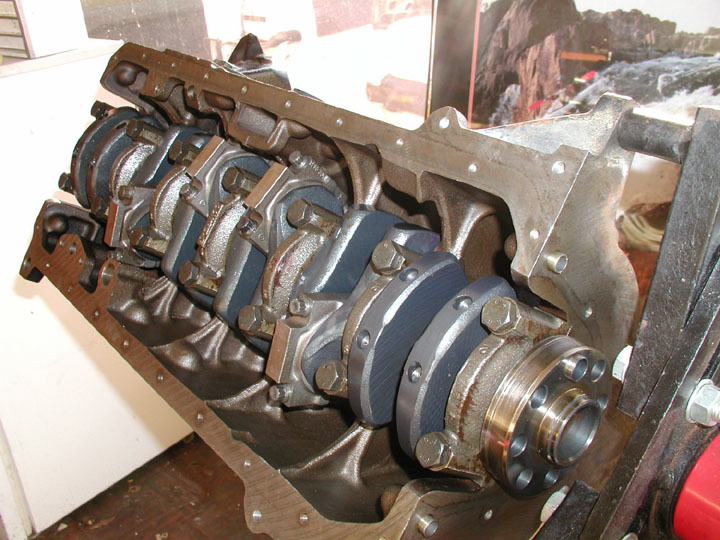
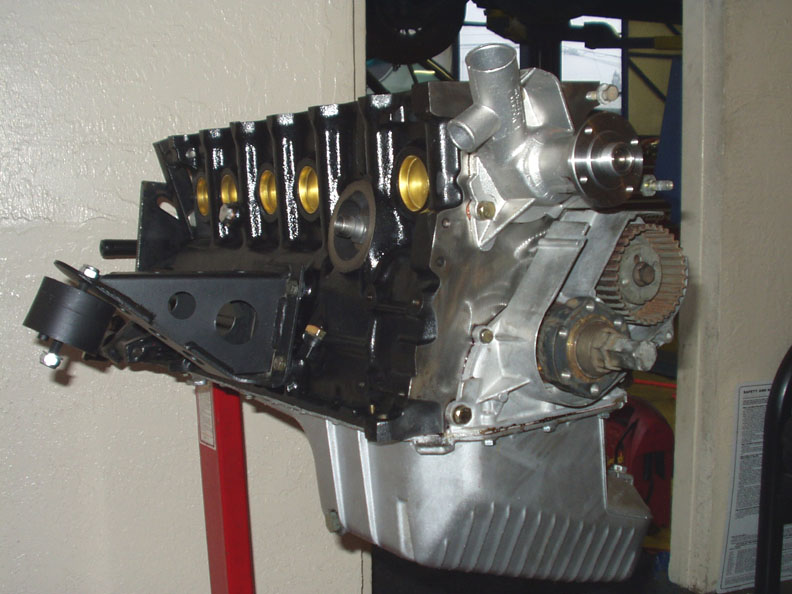
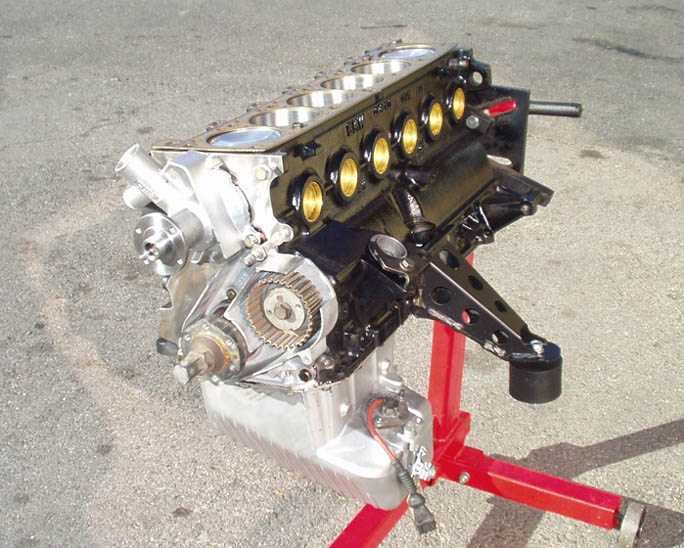
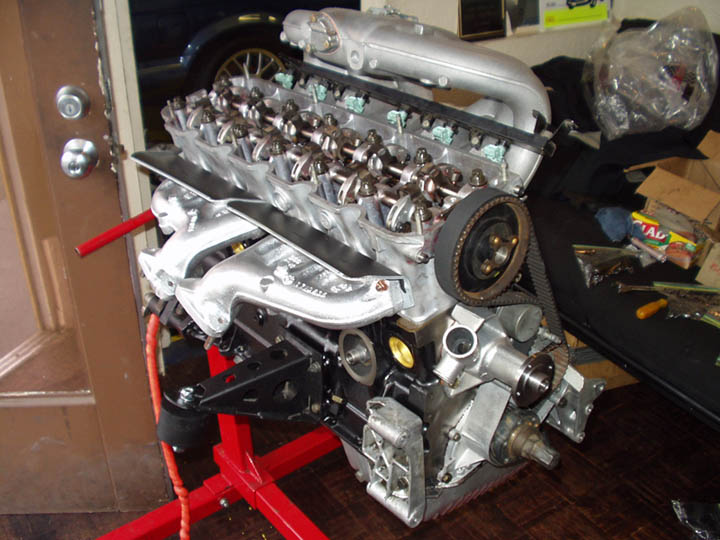
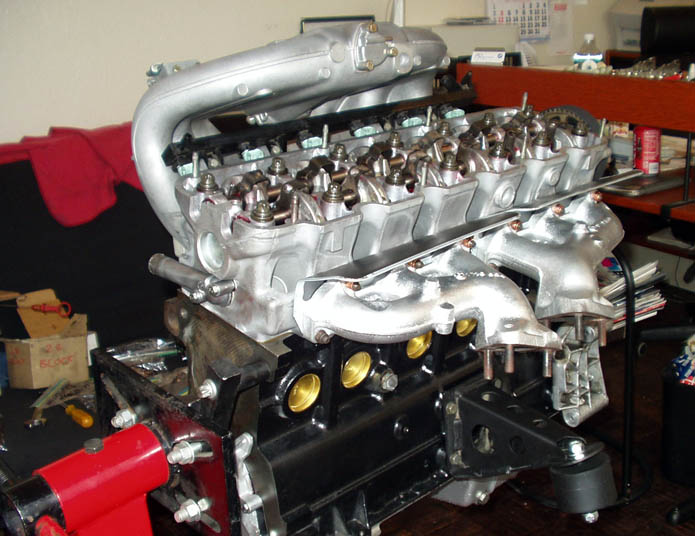
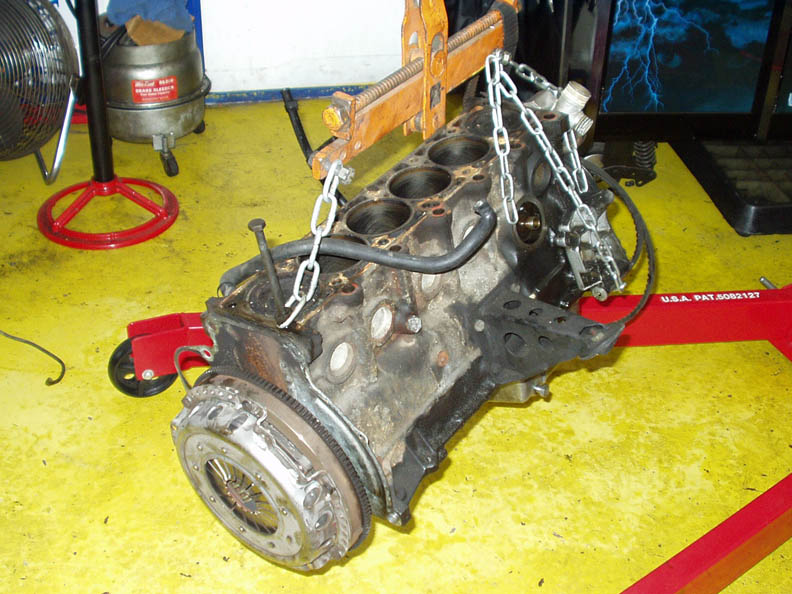
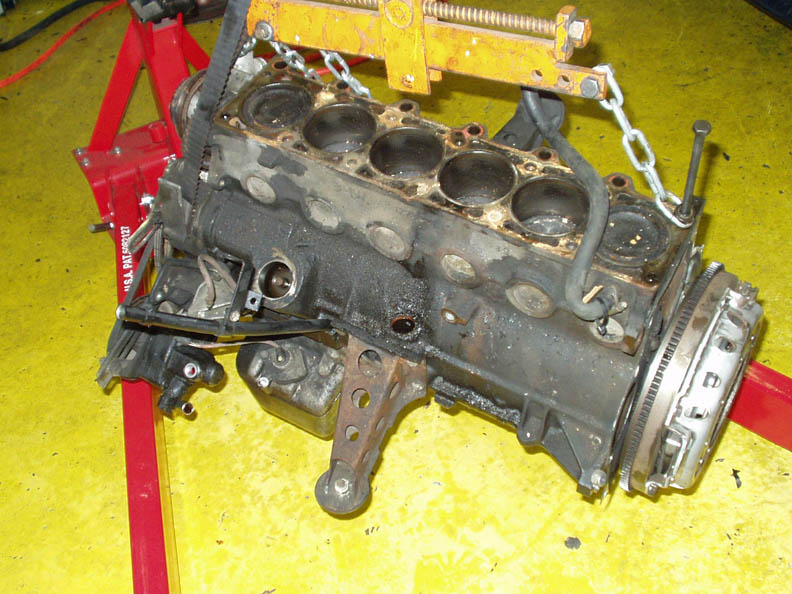
Short Block
For this conversion, I decided to make a 2758cc (2.8 liter) stroker M20 engine by custom ordering 9.5:1 85mm (+1mm overbore) pistons from Arias. I started with a spare 325e block and decided to build the 2.8i engine on a stand then swap the engine into my car.
For all you do-it-yourselfers out there, boring and honing the block is not something that can be done in your backyard using sandpaper and a Dremel. I took the bare short block, pistons, main bearings, connecting rod bearings, and 524td crankshaft and dropped all of it off at Terry Tinney of Performance Motors in Livermore, California.
The 524td crankshaft has the same 81mm stroke as the 325e crankshaft but is forged instead of cast so it is stronger but 3.3 lbs heavier. It is not necessary for the conversion because contrary to popular belief, 325e cranks are fairly strong themselves and will withstand revs to the stock 325i 6700 RPM redline.
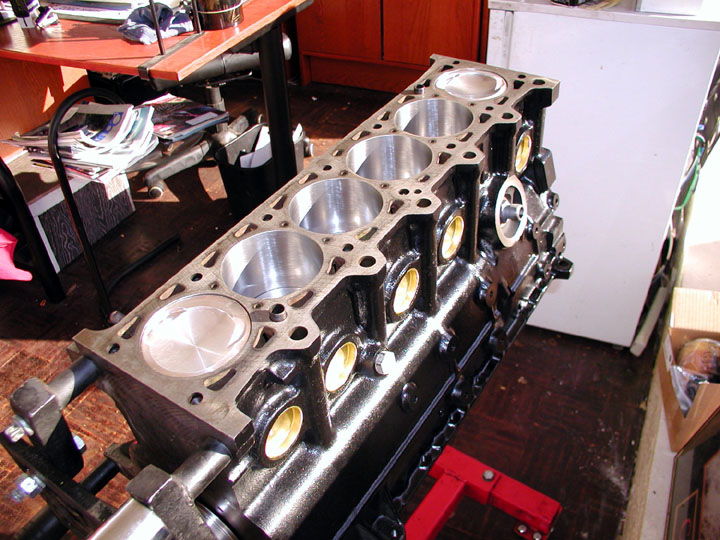
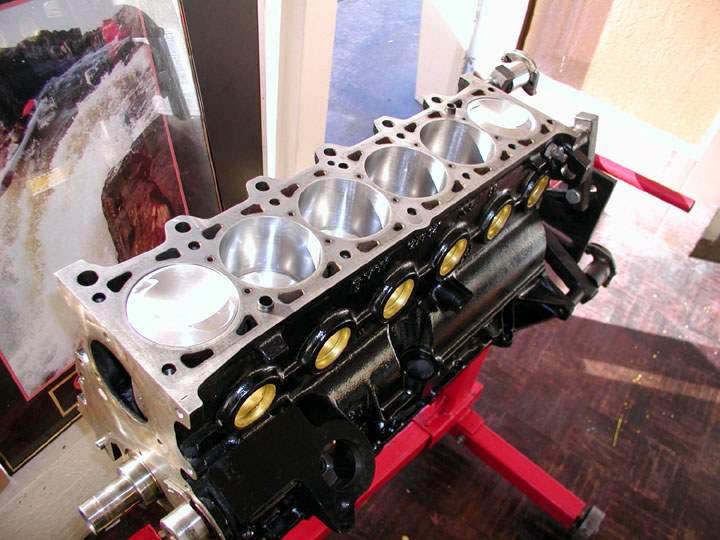
Once I got the short block back from Terry, it was time to close everything up, starting with the seals. To get the seals into the lower cover, simply tap them in with a hammer, then liberally apply grease in the center of them. Use a gasket sealant to apply the gasket onto the cover, then place it on the block and tighten the four 13mm bolts. If your oil pump is bad, or if you suspect that it is going out, now is definitely the time to change it. Remove the four 10mm bolts then carefully take out the two main gears and inspect them for damage. If they look okay, put everything back together then mount it to the block using the three 13mm bolts and torque to 16 lb-ft. But if you find that the gears are consistently scored, better get some new ones. The part number is 11-41-1-280-880 for the smaller gear and 11-41-1-267-796 for the larger one.
For the rear crankshaft seal, tap it in with a hammer so it is completely flush with the cover, add gasket sealant to the metal gasket, then put everything together on the block and tighten them down to 16 lb-ft.
If the oil pan, exhaust manifolds, or engine mount supports look somewhat grimy, you should clean it off if you haven’t already done so. If they are damaged, now is the time to replace them.
To install the oil pan gasket, take the gasket sealant and again, liberally apply it on the bottom edge of the engine block then place the oil pan gasket over it (it only fits one way). If you accidentally misalign it, quickly readjust it before it dries. Apply some more sealant to the other side of the gasket (now facing you), then place the oil pan over it. Drop some bolts in to hold the pan in place, then torque them all down to 7-8 lb-ft. You’ll want to loosely attach each bolt as you go around the pan and gradually tighten the bolts as you go along. Be careful not to overtighten them because if you do, the gasket will break and you’ll have to do the job over again.
The oil level float simply attaches onto the top of the oil pan. Tighten the 10mm bolts to 14 lb-ft. There is a rubber o-ring that goes inside that should have been changed and greased. The dipstick housing actually goes into the block by friction. Add some sealant on the bottom of the housing up to the metal line, it’s about 1″ from the bottom, and pound it in. (If you are transferring the dipstick housing from another engine, make sure you don’t clamp down too hard with pliers or vice grips, otherwise you will leave a sizeable indentation and can’t get the dipstick in or out. Ask me how I know.) Install the oil pressure switch on the passenger side, below the oil filter housing, and tighten it to 25 lb-ft with a 22mm deep socket or wrench.
If the block does not have the cover on the driver side of the block by the #2 cylinder, then you’ll have to install it along with an o-ring. The part number for the cover is 11-41-1-276-333 and the o-ring is 12-11-1-276-333. Tap it into the block with a hammer and tighten it down with the bracket (P/N 12-12-1-364-199).
The motor mount supports simply bolt onto the left and right sides of the block and are not interchangeable, so you’ll know which one goes where. Torque down the 13mm bolts to 16-18 lb-ft, but don’t tighten the motor mounts because they’ll have to be readjusted once the engine is in the car. If the supports look funny on the engine stand (like the passenger support is tilted way up and the driver one is towards the ground), don’t worry because the block sits inside the engine bay at an angle.
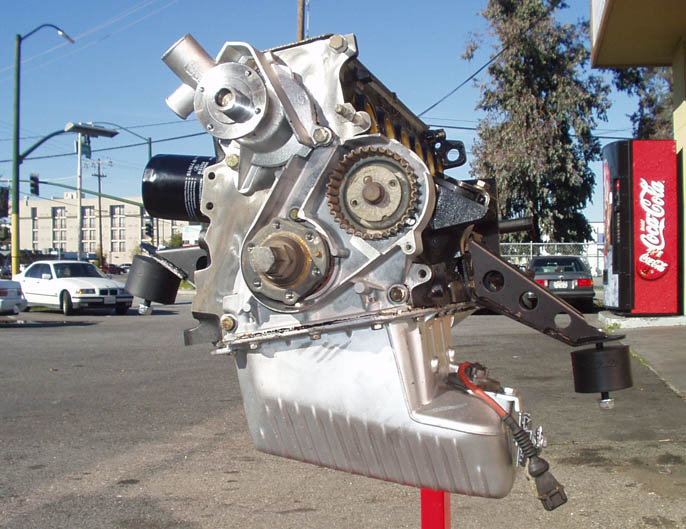
Add the water pump (again, use that gasket sealant and tighten the bolts to 16 lb-ft) and front gear wheels. Don’t add the timing belt yet because without a cylinder head, it’s kinda pointless.

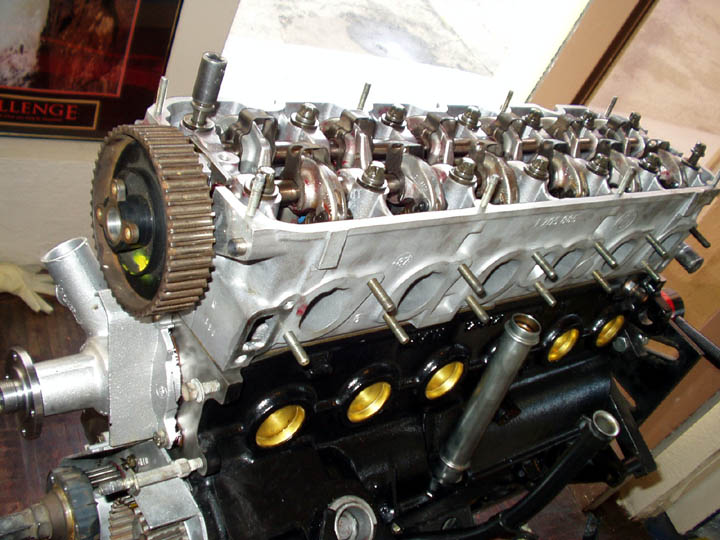
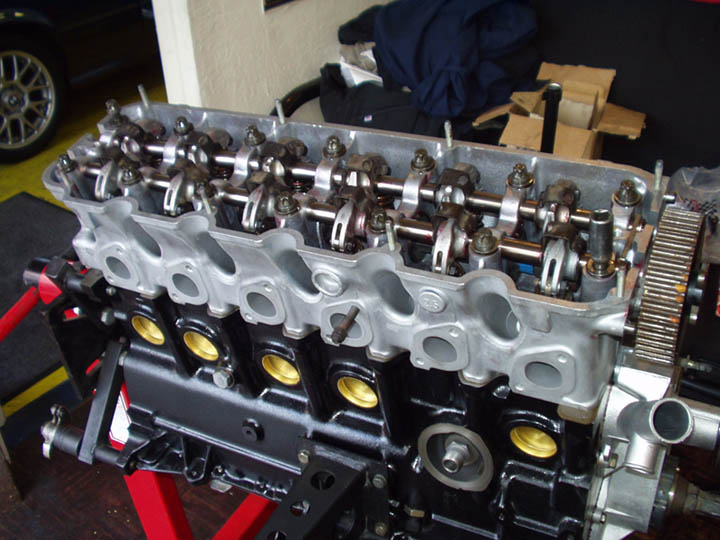
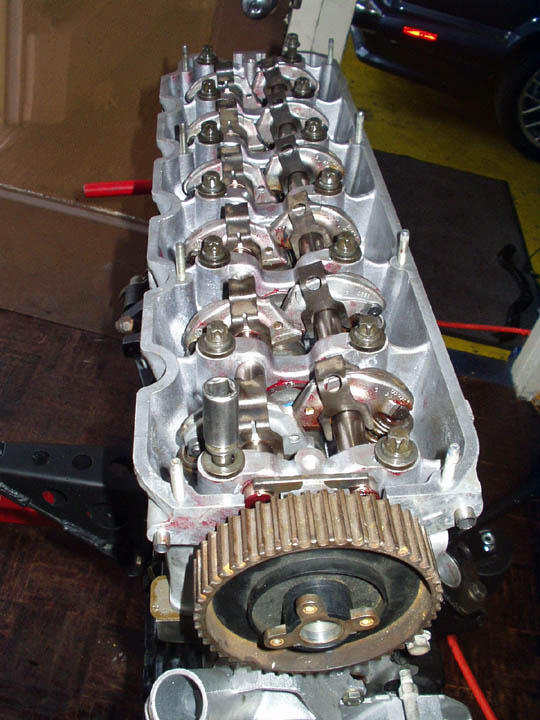
Cylinder Head
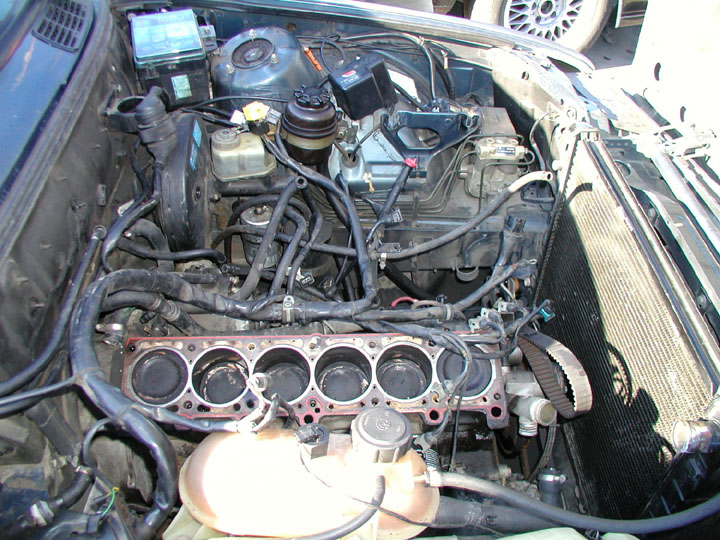
Obviously, you’ll need a complete 325i cylinder head for this project unless you have a 1988 325 or 1988 528e (in which case you already have one, but you’ll need to get a 325i cam and set of dual valve springs). I purchased my 325i cylinder head used but unfortunately it was in less-than-perfect condition – there was a lot of carbon buildup on the valves, the guides and seals needed replacing, and the cam lobes looked pretty worn so I had everything redone at the machine shop, including new valves, guides, seals, and even a new cam, rocker arms, and even new double valve springs. I pretty much ended up with a brand new cylinder head. You can also install a hotter camshaft, titanium valve springs, larger valves, etc, but I chose to leave everything stock.
Use the stock head gasket; do not use the oversize (thicker) gasket because it will lower compression and render your $1,000 pistons useless. The stock gasket will work with +1mm overbore pistons, but if you go +2mm then you’ll probably need a special oversize one.
Fortunately, BMW designed the gasket to fit only one way (unlike, say, a Honda Civic), so there really isn’t any way of putting it on backwards. Align the head with the gasket and block and it will sit right on top. Lubricate the E14 torx head bolts with oil, then initially torque them down to 30 lb-ft. Retorque them 90 degrees after a few minutes, then again once the motor is installed and the engine has been run.
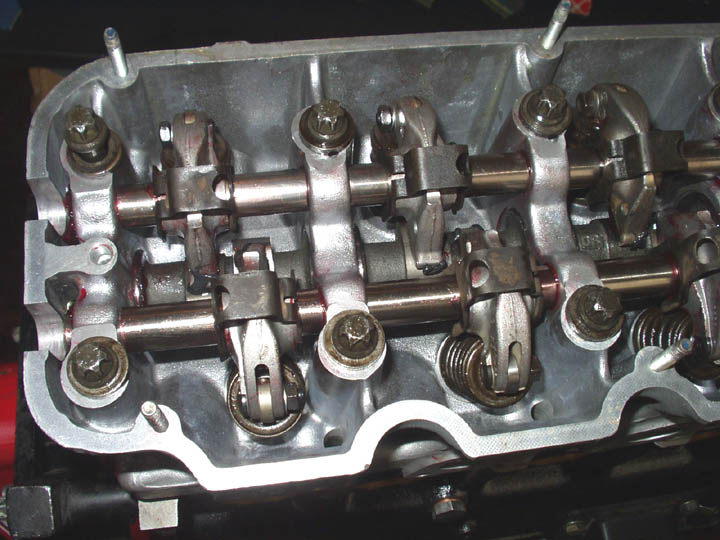

Adjust the valves to 0.09″ for the intake and 0.10″ for the exhaust. You’ll need a 10mm wrench, feeler gauges, and the valve adjusting tool. If you don’t have the valve adjusting tool, then break off the antenna off your neighbor’s Acura and bend it 45 degrees, that also works just as well. Turn the crankshaft with a 22mm wrench to get the cam to move. Then add the four rocker shaft plugs and valve cover gasket.
Install the exhaust manifold gaskets and exhaust manifolds. Tighten the bolts down to 17 lb-ft.
Intake Manifold & Fuel Injectors
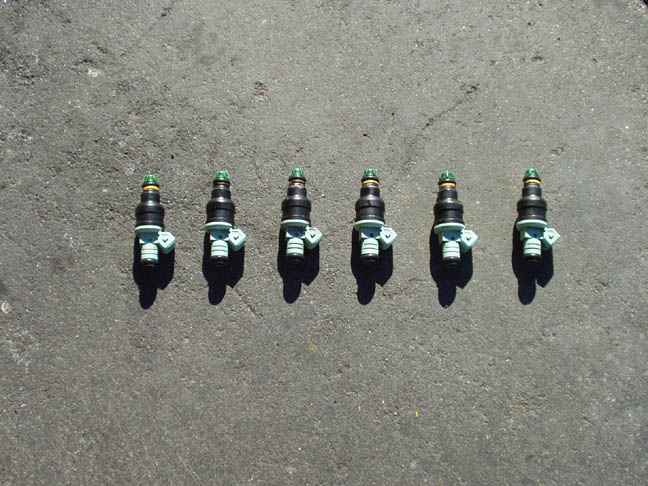
Start off by installing the fuel injectors onto the fuel rail. I decided to use M50 injectors because of its higher flow rate, as the stock 325i injectors are known to lean out at very high RPM.
You can also use injectors from an M30 535i/635i/735i, or Ford Mustang 5.0, though each one has a different flow rate. So which one should you buy? Depends on what works for your application. To figure out how much power an injector is good for, take the flow rate (cc/min) and divide it by 5. That will give you the maximum horsepower that injector can support. Multiply that number by 6 and that will tell you how much total horsepower all six injectors can support. (This formula assumes zero injector clogging, 100% injector duty cycle, and 14.7:1 air fuel ratio. Since injectors tend to clog over time, 100% duty overloads the injectors, and 14.7 isn’t always a constant, it’s better to get injectors that moderately exceed the amount of power your car will produce.) For example, the stock E30 325i fuel injector is rated at 149cc/min. Divided by 5, it can support 29.8 horsepower per injector, or 178.8 max brake horsepower. That’s sufficient for stock 325i’s, but for modified cars it’s not good enough. Here are a few upgrades you can use:
S52 injector (from E36 M3 [1996+], M Coupe, M Roadster)
BMW Part Number: 13-64-1-703-819
Bosch Part Number: 0-280-150-440
Flow Rate: 205 cc/min
Color: Burgundy
Maximum HP Supported (100% DC): 246
Ford Mustang 5.0 injector
Ford Part Number: FOTE D5B
Bosch Part Number: 0-280-150-556
Flow Rate: 200 cc/min
Color: Yellow
Maximum HP Supported (100% DC): 240
M50/M52 injector (from E36 325i/325is/323is)
BMW Part Number: 13-64-1-730-060
Bosch Part Number: 0-280-150-415
Flow Rate: 190 cc/min
Color: Pale Green
Maximum HP Supported (100% DC): 228
M30 injector (from E28 535i/535is, E24 635CSi, E23 735i)
BMW Part Number: 13-64-1-276-149
Bosch Part Number: 0-280-150-203
Flow Rate: 185 cc/min
Color:
Maximum HP Supported (100% DC): 222
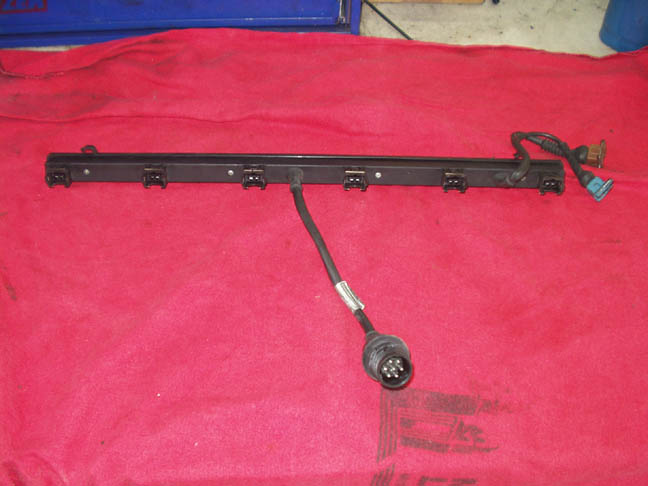
Replace the injector o-rings (there are two per injector, P/N 13-64-1-730-767), but be careful not to break the cap on top. I actually cut the top o-rings out. Apply grease or gear oil on all the new o-rings then slide them onto the injectors. Pop each injector onto the rail then secure each with the plastic clip. Install the 325i fuel rail onto the intake manifold and tighten the four 10mm bolts to 8 lb-ft.
Later model 325i’s use a secondary harness just for the fuel injectors, unlike the 325e’s wiring harness which connects directly to the injectors. Because of this you should use the 325i fuel rail because the 325e’s fuel rail has an outlet for a return line right next to the #6 injector. If you do use the 325e rail, you’ll have to figure out a way to wedge the 325i’s harness rail underneath it without breaking anything.
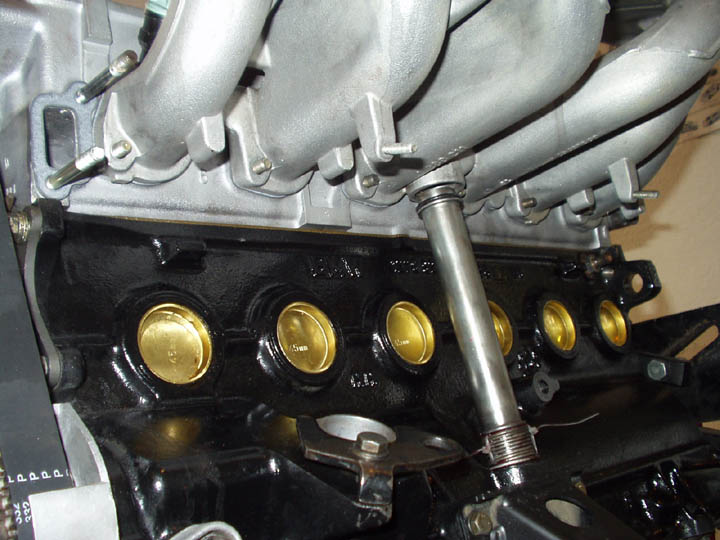
Install the block breather tube by compressing the spring (I used two tip ties to hold it in place), then aligning the tube from the block and manifold. Once it is sitting in place, push the bottom spacer to the block then cut the zip ties so the spring releases. The tube should hold in place now.


Now for the fuel management system.
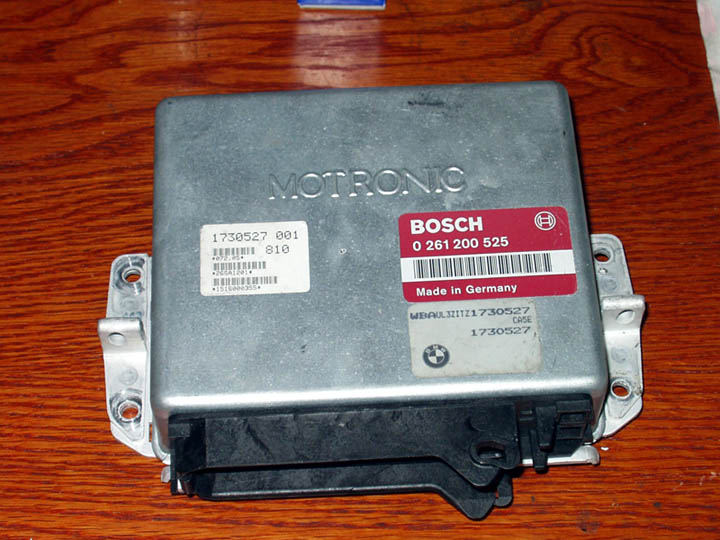
First, you’ll need a Bosch Motronic 1.1 or 1.3 ECU instead of the Motronic 1.0 unit that’s currently in your eta. The 1.1 system, easily identified by its 0-261-200-153 Bosch number, is the early version and was only used for one year before being updated to Motronic 1.3, so you’ll probably want to use the 1.3 unit instead. There are several 1.3 ECUs available and they are all the same; 0-261-200-173, 0-261-200-380, 0-261-200-524, or 0-261-200-525. They came from the 1989-1991 325i’s and 1989-1990 525i’s. The one I have is the *525 from an E34.
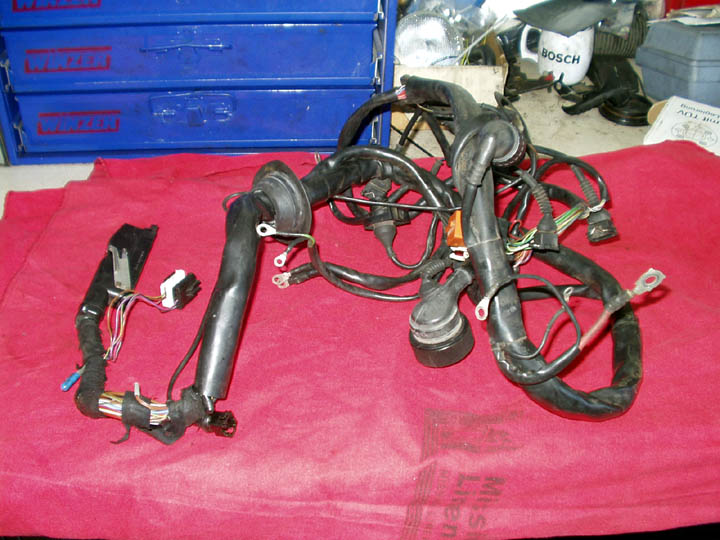
The wiring harness may look daunting because it is a jumble of wires and connectors, but if you trace the harness starting from the ECU connector, you can figure each one out. If not, don’t worry, I got you covered below. I chose not to wire it on the engine stand because most of the connections were outside of the engine. All I did was connect the fuel injector rail to the harness so it was attached to the engine.
But before I could put the 2.8i in, I had to take the old 2.7 eta engine out.
Engine Removal
The removal of my old 2.7 eta engine wasn’t that complicated because half of it was already gone, as I started parting it out while building the 2.8i.


Half the coolant was already drained but I drained the rest of it by unplugging the radiator and block plugs. Take out all the coolant hoses, and if you plan on reusing them then make sure you label each one. I removed the oil filter and drained the oil, then disconnected the two lines from the power steering resevoir and the lines from the pump and let all the ATF drain out. Leave all the power steering hoses disconnected, and if you have the car in the air it may help to turn the wheels back and forth to get more out of the system. Finally, I disconnected the line from the windshield washer resevoir to the hood (because I’m going to remove the hood later), took out the holding screw and unplugged the sensor, and removed the entire resevoir.
Take out the radiator as well. It’s only held in place by two 10mm bolts on the left and right sides.
The 325e engine wiring harness can be removed and discarded since it cannot be used for the conversion. From inside the car, unplug the connector to the ECU (and also take out the ECU and idle control module [green box]), then pull the wiring harness through the firewall. Trace the wires back to various components such as the ignition coil, oxygen sensor, alternator, fuel injectors, fusebox, airflow meter, throttle position switch, idle control valve, oil pressure switch, coolant temperature sensor, crankshaft sensor, auxiliary relays, etc and disconnect every one of them. You’ll want to use a pick to take out the clips that hold the connectors. (Labeling the connections is somewhat useless since everything is going to be replaced with 325i parts.) Once it’s out, toss it aside.
Take out the 2 or 3 bolts that hold the starter onto the transmission and block. You may be able to get it out from there, but if it still doesn’t move, don’t worry because you can get it when you’re taking out the transmission.
If your A/C is charged then it needs to be evacuated. Mine wasn’t, so I put on some safety goggles, disconnected the two lines heading into the air conditioner compressor, opened the lines half way, waited for the pressure to decrease, then took them out. If your compressor is still good, plug the holes so no dirt enters it.
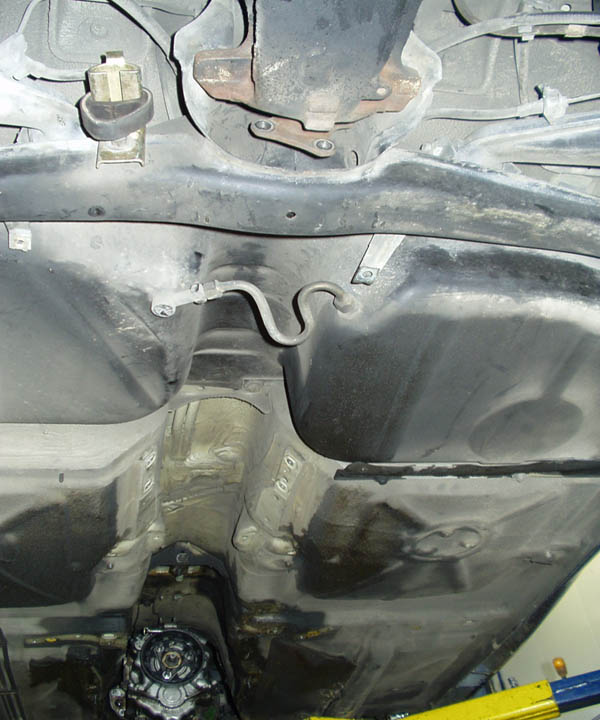
Jack up the car and take out the lower transmission/oil pan cover. You’ll need an E14 torx female socket and a 10mm socket. Once that’s out, you’ll have to drop the transmission to pull the engine out. (Well, you don’t have to since I’ve seen some people pull out the engine with the transmission.) In order to drop the transmission, you’ll have to drop the driveshaft, and in order to do that, you’ll have to take out the exhaust, heat shields, and transmission supports. My exhaust came out very quickly since the catalytic converter wasn’t attached to the cylinder head or the manifolds. All I had to do was remove the oxygen sensor (you don’t need that anymore), take out the rubber donut, and unscrew the two 10mm muffler hangar bolts. It is helpful to actually jack up the exhaust itself to remove the rubber donut. I removed the entire exhaust assembly as one unit. Unplug the oxygen sensor harness – it’s hidden behind the metal cover, runs to the battery tray inside the engine bay, and connects to the engine wiring harness.
The transmission support comes out by taking out the two 13mm bolts on the left/right sides, then by loosening the 13mm bolts on top of the rubber mounts.
Remove the heat shields by unbolting the two 10mm bolts towards the rear of the car, then all the other 13mm bolts along the sides and front. Watch out for dirt falling into your eyes! Once it’s out, take out the two bolts that hold the center support bearing of the driveshaft. I needed to have mine replaced, so I dropped the entire thing. Starting at the differential, I turned the wheels (your car is off the ground, isn’t it?) so the 17mm bolts were accessible. A pry bar is necessary to apply force and get the bolts loose. Then remove the 17mm bolts at the front of the driveshaft. The flex disc should come out at the same time.
If your car had a leak at the rear transmission seal like my car did then you’ll probably see a whole lot of sludge built up in that area. Use a good degreaser and scrub it down if you care about how your car’s most intimate parts look.
Drain the transmission fluid by removing the plug at the very bottom of the transmission, which makes things less messier when you take it out. While it’s draining, go inside the car and take out the shift boot and knob. Once the transmission is drained, close the plug and place a jack under it. I had my car on a lift so I used a tall screwjack, which I placed just aft of center. From there, take out the crank and speed sensors with a 5mm allen socket. Now here’s something to note: The 325e has these sensors located on the transmission, but the 325i doesn’t. The 325i doesn’t have the speed sensor connected on the wiring harness and the crank sensor is located on the vibration damper pulley on the front of the engine. You can either remove these sensors and plug the holes or leave them in place but tie them out of sight. I chose the former. Remove all the hex (17mm) and torx bolts (E14) from on the transmission bell housing. Some of the bolts are a nightmare to get to, so use several extensions, a flexible ratchet, and a breaker bar to get things loose. Air tools are a definite plus here.
Before breaking the transmission loose make sure that the engine is properly supported so it doesn’t fall below the car. Even a piece of wood behind the block and a support jack in front will help, but make sure nobody is under it anyway. Once all the transmission bolts are out, gently rock it back and forth (a friend here will help) and it should slide out. If not, then grab a pry bar to get things loose. If you have a third person to help you, have them remove the jack under the transmission so you and your friend can move it out.
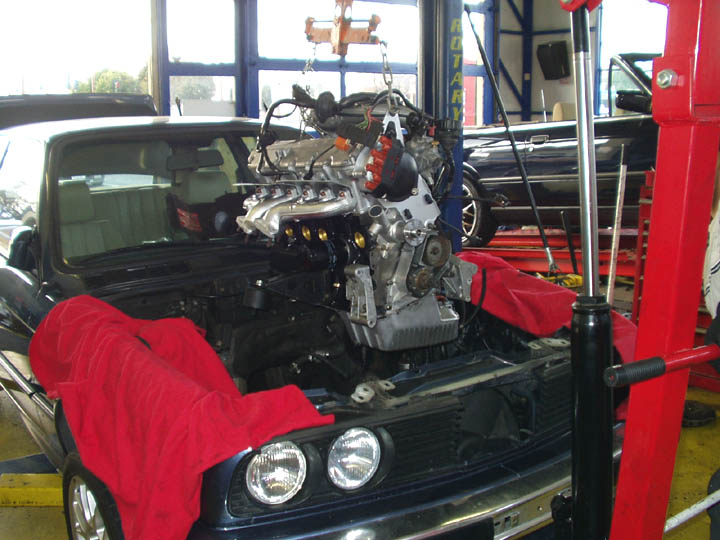
Now you’re ready for the engine to pop out. Double check to see that all the coolant, fuel, electrical, vacuum, brake, power steering, or A/C lines are free and that there is nothing else holding the engine in place. Be careful because if you lean on the engine, it will definitely fall forward. We wanted to use an engine hoist to pull the engine so removal of the hood is necessary. I took out the clip at the arm of the hood and released the pin so the hood was free from the shock. The windshield washer fluid should be already free, so all there is left are a bunch of 10mm bolts and one ground strap to remove. While you’re doing this, have your friend hold the hood so it doesn’t fall forward or backward. Once the last bolt is free, gently move the hood away from the car and set it down somewhere. If you can, lie it flat but if you’re short on space, place a bunch of soft rags/towels on the ground so you don’t damage the paint and stand it upright.
We rolled the engine hoist towards the motor and attached the straps on the front and rear of the block. One went around a head bolt near the #6 cylinder and the other went around the water pump (hey, it works). For additional reinforcement, we wrapped the timing belt around the cherry picker straps, because as we all know, BMW timing belts are stronger than steel.
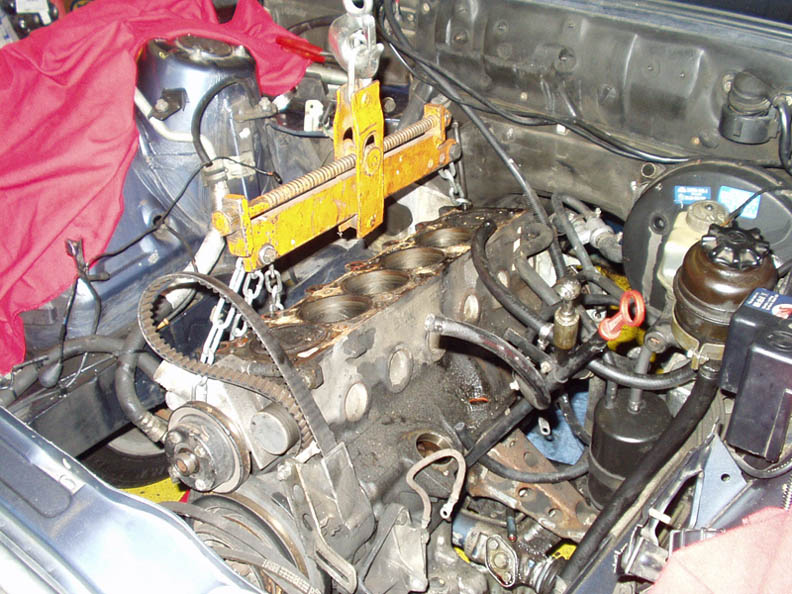

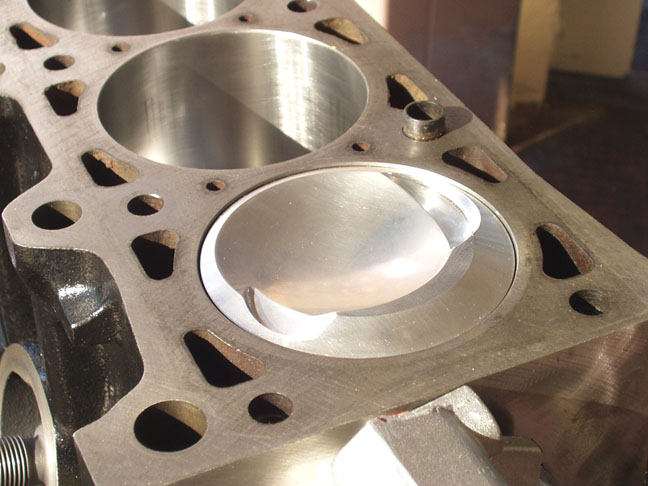
You’re actually supposed to remove the 13mm bolts from the engine mounts to completely free the engine, but mine were so old that I just said hell with it and lifted the motor with the mounts still attached and it ripped right off. Once the engine was out, we backed it away from the car and pulled off the 13mm bolts from the clutch disc and pressure plate and the 17mm bolts from the flywheel. The pilot bearing also came out quite nicely as well. We also pulled off various parts such as the power steering pump and A/C bracket. Despite the outside of the block looking in a pretty sorry state because of various oil and coolant leaks, the cylinder walls still had the original factory cross-hatching at 221,000 miles!
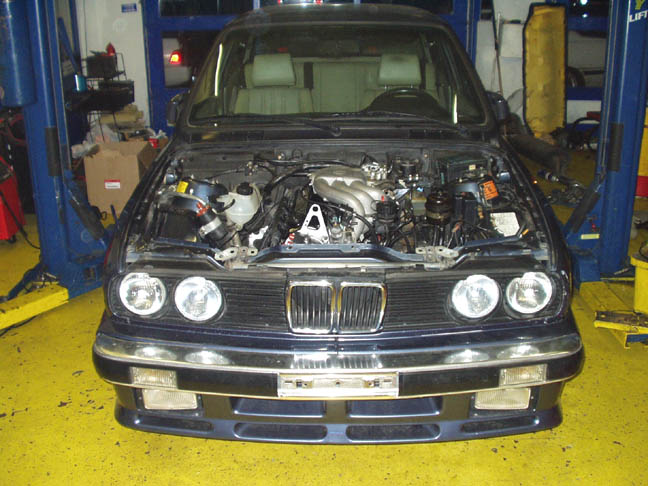
Engine Install & Wiring Harness
Installing the engine was surprisingly the opposite of removal. The engine went in without a problem. Once it was in we tightened the motor mounts and wedged a wooden block behind the cylinder head and another in between the timing cover and front frame to prevent it from literally falling through the cracks.

The car went up in the air and the transmission and driveshaft were reinstalled. Like I said earlier, the eta’s Getrag 260 manual gearbox has two sensors located on the driver side; the lower one being the reference sensor and the upper one being the speed sensor. The 325i’s reference sensor is located on the vibration damper in front of the engine and does not use a speed sensor, so these two will have to be plugged. I removed both sensors and plugged the transmission with the rubber brake caliper bolt covers.
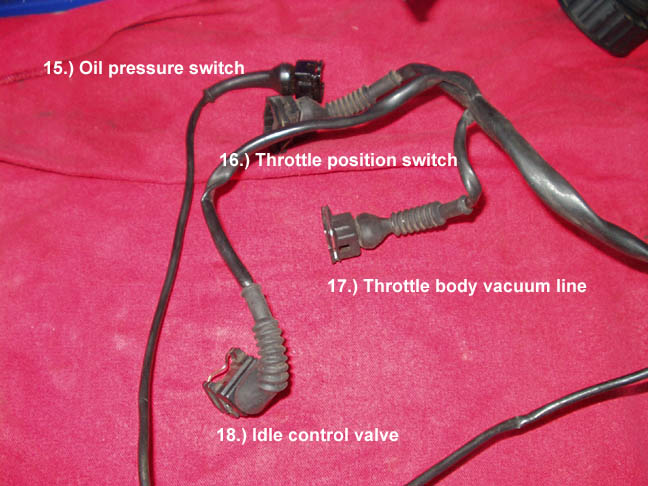
Once the engine was in its normal resting position, I started to work on the 325i wiring harness. In case you don’t know where anything goes, I tried to make things easier by labeling the connectors:

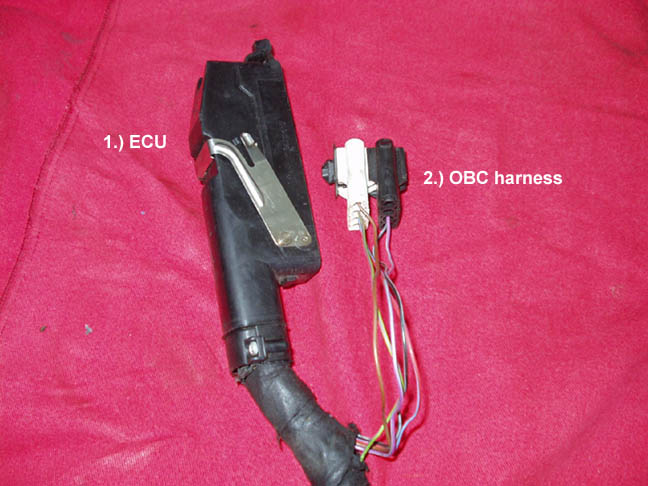
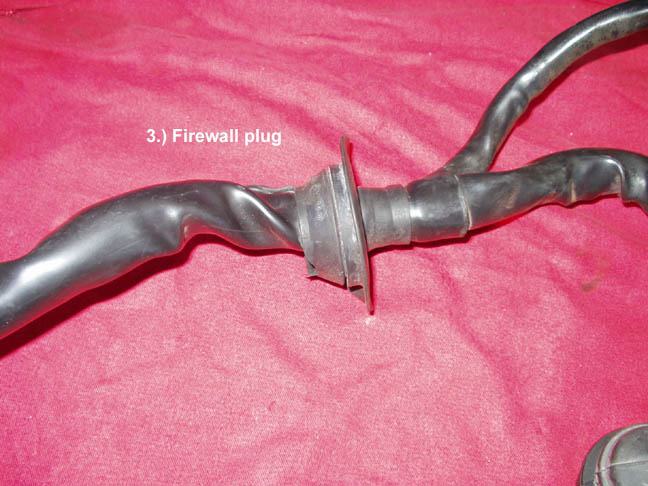


I started with the ECU and mounted the 325i unit inside the glovebox, then tried to feed its connector from the engine bay into the passenger compartment through the firewall opening, but the new connector was far too large for the hole. So I had to take a die grinder and literally bore the hole out to get it through, painted the now-exposed metal so rust wouldn’t form, then fed the connector though. I had to mount the ECU only using two of the four holes (the rear ones) because the glovebox cover would not close if it was in its proper position.
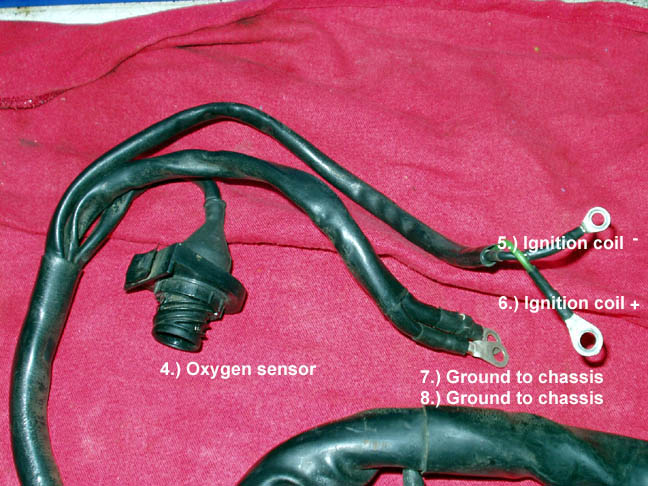
Next, I removed the eta’s oxygen sensor wire and threw it away since it was a 3-wire connection and is now useless. I used the bolt from the battery tray connector and used it as a ground for the harness.
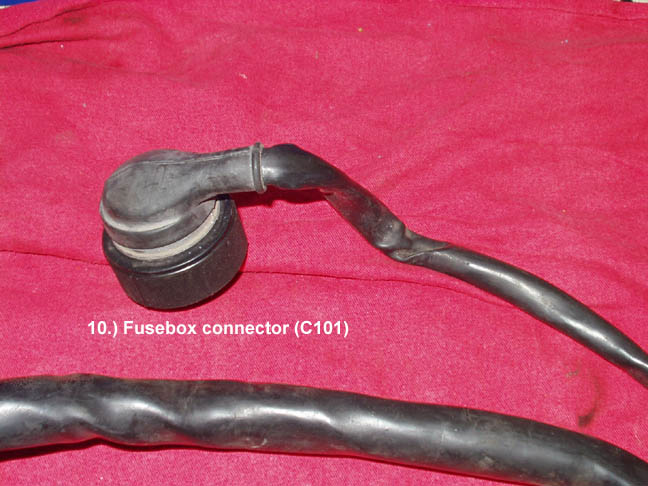
I left the O2 sensor connection dangling below until I bolted up the exhaust, then I wired the green and black wires to the ignition coil positive and negative, respectively. Now going the other way, I forced the thick wiring harness in the firewall holder and connected it to the fusebox.

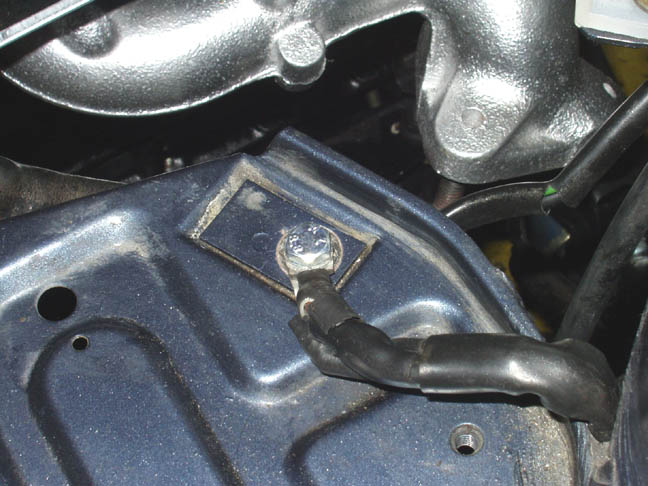
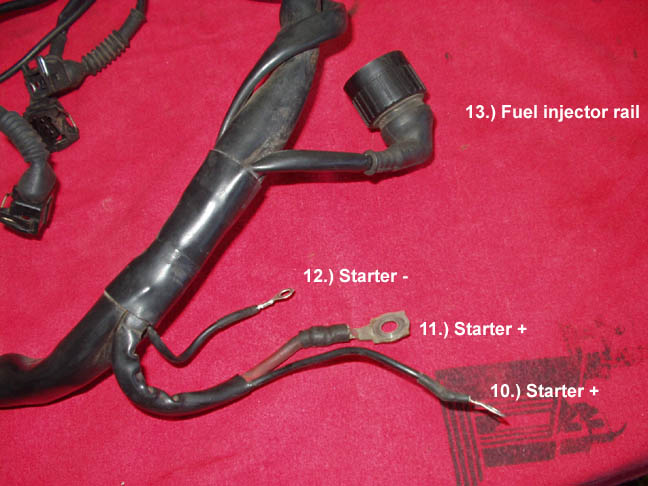
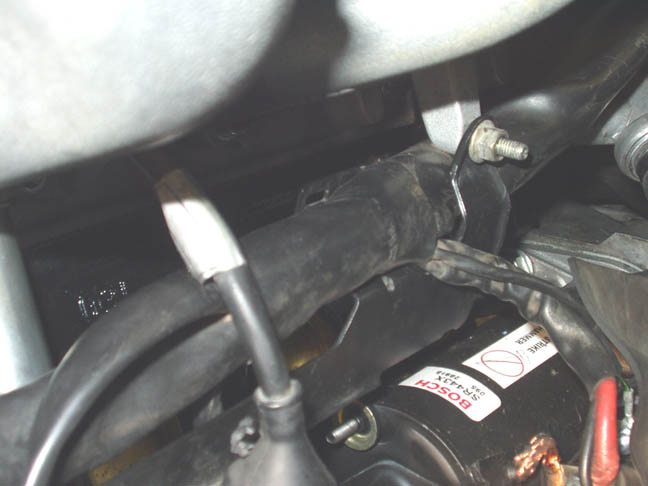
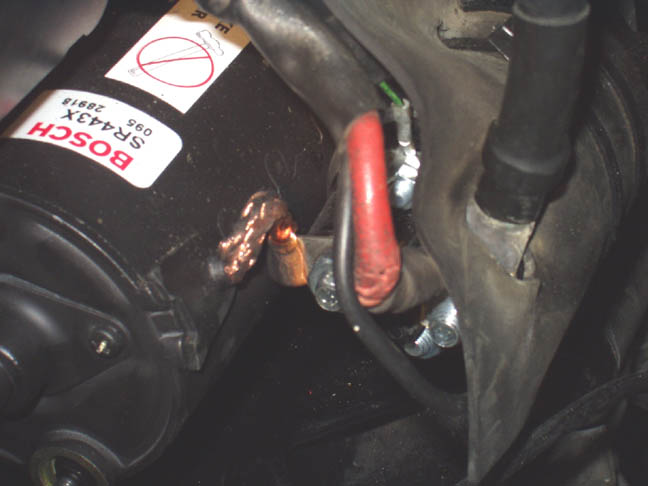
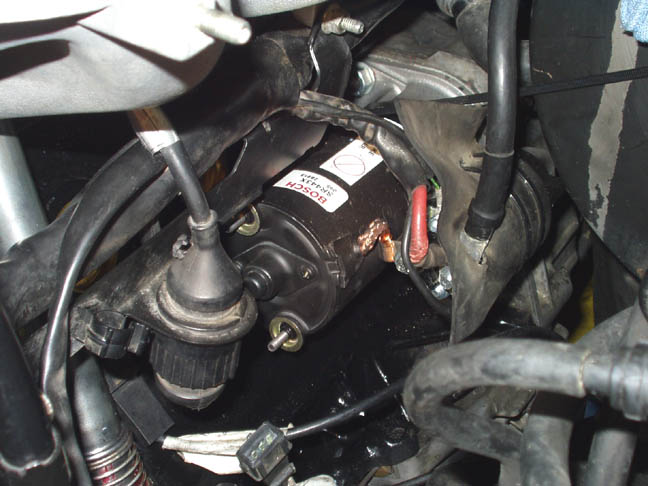
From there, the wiring harness dips below towards the block and is held in place by a metal bracket that attaches to the intake manifold. The first wires you connect are the starter negative and positive, but when you attach the red starter positive wire don’t forget to also connect the power wire that goes to the battery terminal:
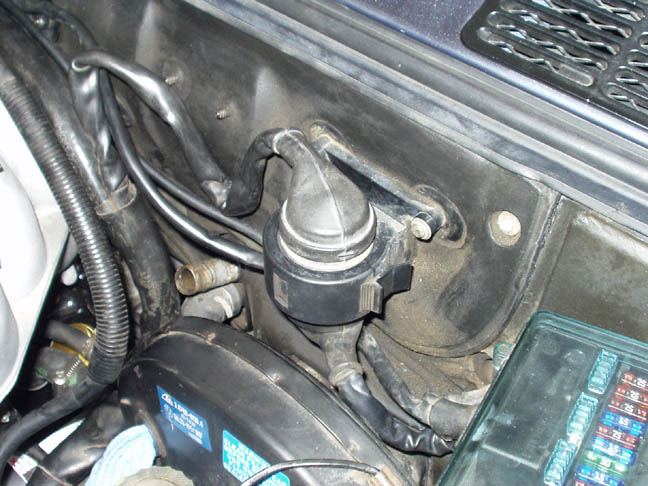
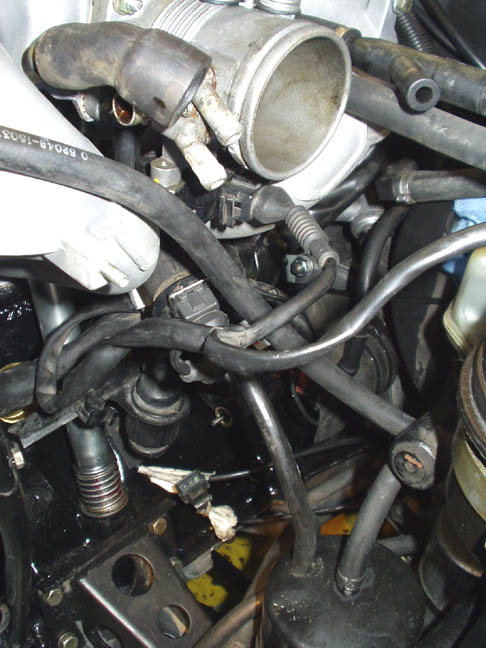
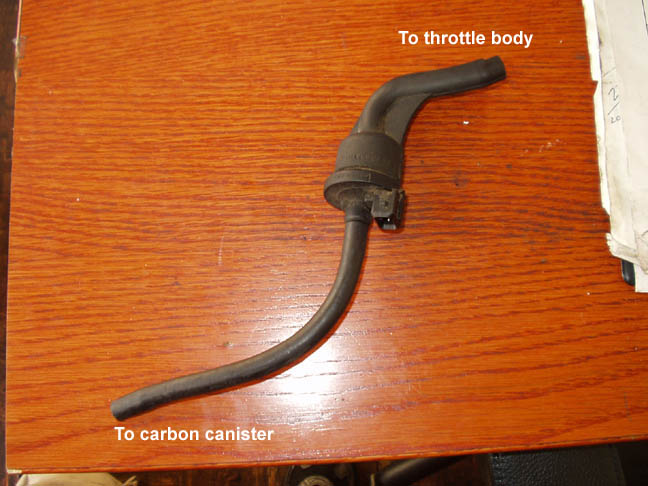
The next wires that come out of the harness are the ones for the throttle position switch, throttle body vacuum, and idle control valve. The TPS is self-explanatory and so is the ICV, but chances are you can’t connect the ICV since you don’t have the airbox or intake boot in But the throttle body vacuum connects to a weird looking nozzle hose, one end goes into the throttle body and the other plugs into the charcoal canister, located near on the driver side strut tower.
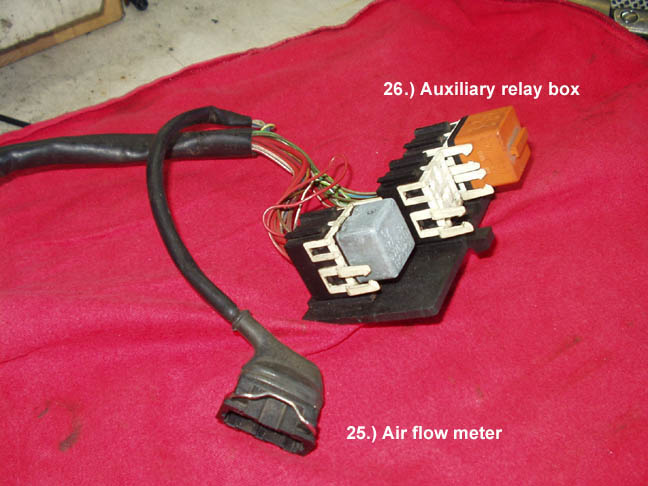
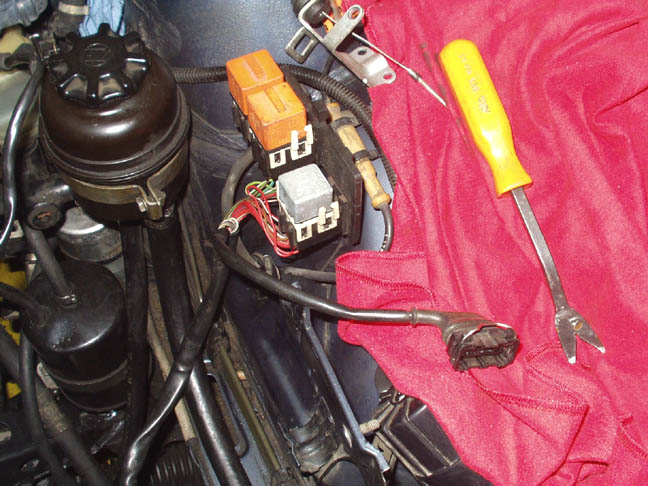
Next you’ll see one lone connector followed by a bunch of relays and another connector. The first lone connector is for the oil level sensor, the relays go into the auxiliary relay box, and the last one goes into the airflow meter, which shouldn’t be in yet. Don’t worry about the altitude sensor since the 325i doesn’t have one. If you are reusing the 325e airbox then the sensor will not be connected to anything anymore.

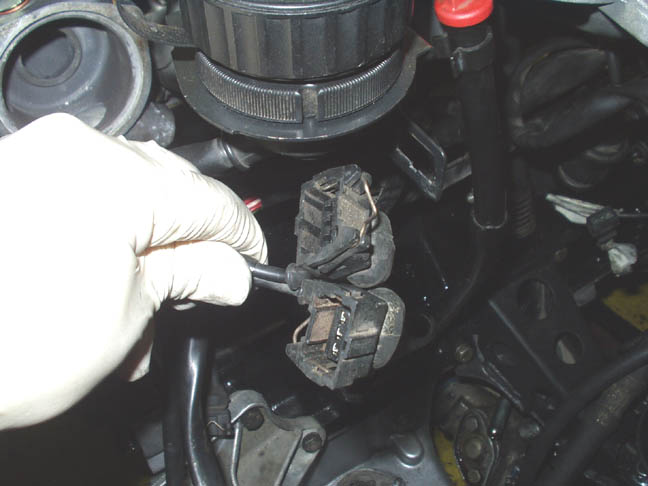
The diagnostic connector fits into the bracket that’s part of the wiring harness bracket, but the the next two plugs are the tricky part. Both are black, have three-prong connectors, and have the same type of release clip. Look closely at their direction, one is naturally upside down while the other one is right side up. This orientation matches with the bracket just below the diagnostic connector. The one that has the release clip upside down is for the ignition loom and is on the passenger side, while the one that is right side up clip is on the driver side of the bracket and is for the crankshaft reference sensor. Both wires go across the cover on the upper timing cover. (Just as a side note, if you cross the two wires the car will not start. So do it right the first time.)
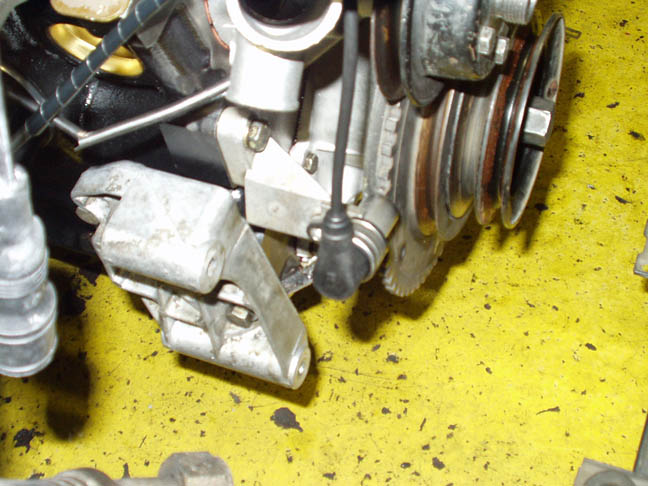
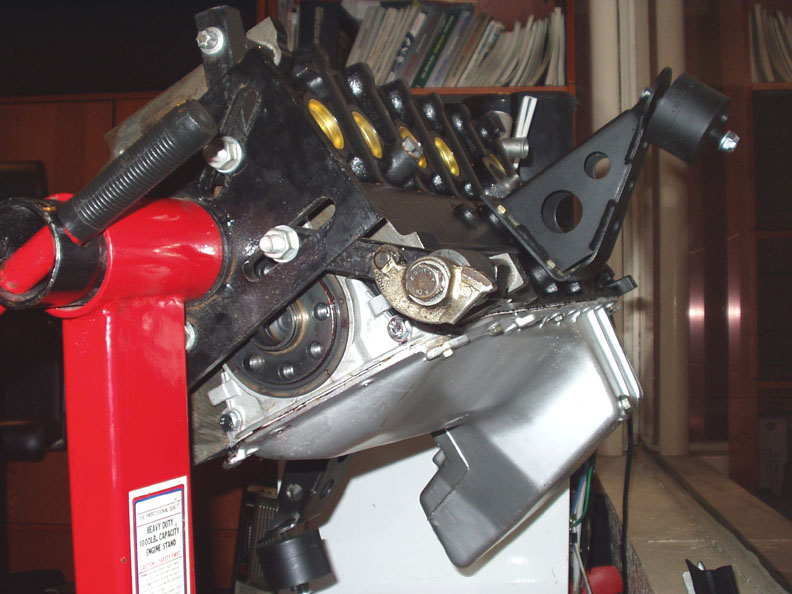
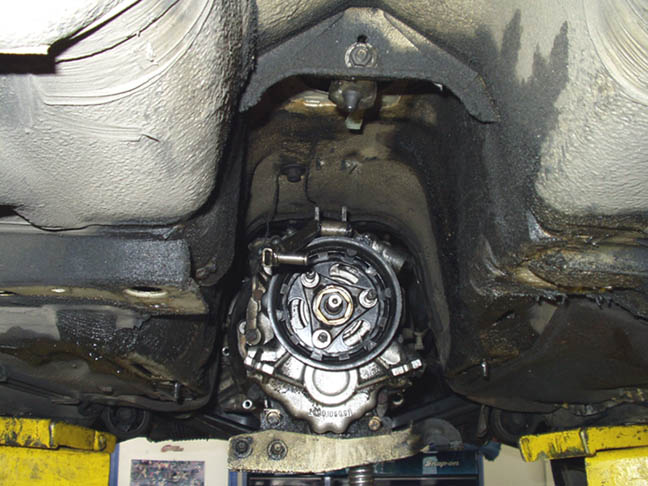
As you can see in the picture on the above right, the crank sensor mounts on the front of the engine (passenger side) on the vibration damper pulley. You’ll need the one from the 325i because the 325e’s damper is smooth and toothless and will cause a no-start condition.
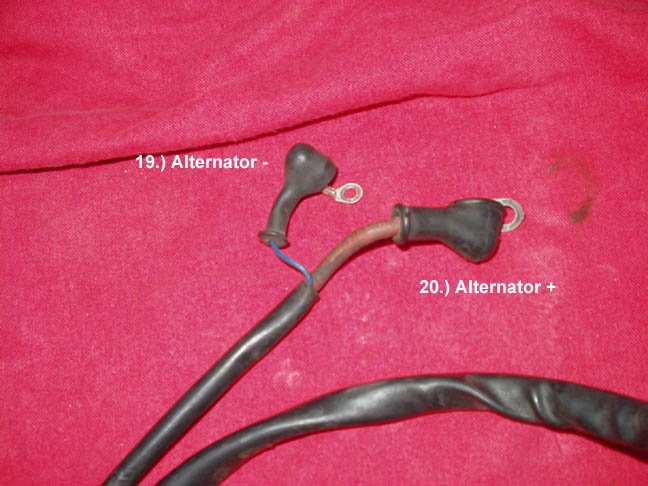
Finally, the last two wires on the harness are for the alternator.
TACHOMETER WIRING
Unfortunately, the 325e tachometer will not work with the 325i wiring harness without some minor modifications.
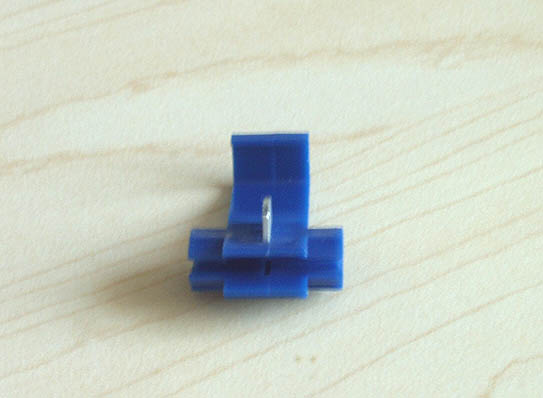
The very first split out of the wiring harness from the ECU is the C104 connector, which is supposed to run to the instrument cluster. Because the 325e and 325i connectors are different, you’ll have to do some splicing or bridging. I wanted to bridge the wires since splicing can be messy and can cause some problems later on for someone else.
If you disconnect the harness from the ECU, you will see 55 pins with the sequence running from right to left, as follows:

Pins 1, 20, and 38 are adjacent to the wires and pins 19, 37, and 55 are on the free side of the connector face.
The two wires that must be bridged from the instrument cluster harness are #6 and #32: Pin #6 is the engine speed output and gives the instrument cluster the signal for the tachometer, while pin #32 is the fuel consumption output and gives the cluster the signal for the econogauge. If you have an OBC with the CODE feature active (and you still want to have it functional), then you’ll also have to bridge the wire from pin #38, which is the input signal that enables the driveaway protection. So you’ll have to bridge:
- black wire from instrument cluster harness to black wire on engine harness (runs to pin #6)
- yellow/white wire from instrument cluster harness to white/black wire on engiine harness (runs to pin #32).

Once you do that everything should work nicely. The OBC, which receives its signal from the instrument cluster, will also function normally afterwards.
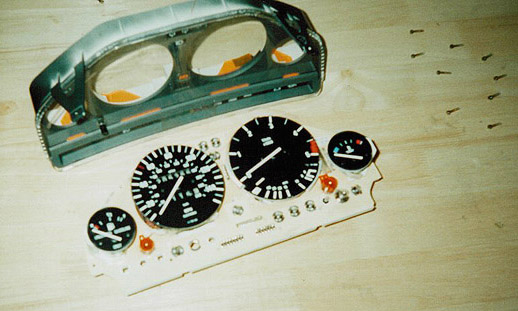
TACHOMETER INSTALLATION
You can use the 325e 5000 RPM tachometer but the needle will not move past 5000 RPM, making it impossible to know the actual RPM between 5000 and 6700. I recommend installing a 7000 RPM from a 1984-1985 318i or a 1987+ 325i, but some conditions apply:
- If you have a Motometer cluster, then you must use a tachometer from another Motometer cluster. Likewise, if you have a VDO cluster then you’ll need a VDO tach. They aren’t compatible so don’t try mixing and matching.
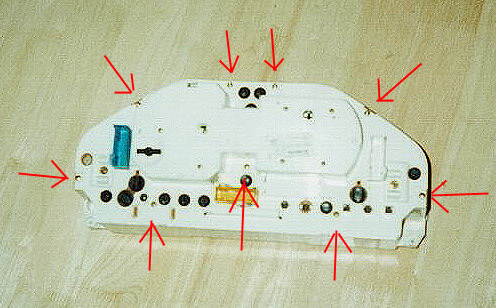
- If your car was manufactured on or before 12/1985, then you must use a cluster from a 1984-1985 318i. After 12/1985 BMW stopped using the tachometer coding plug behind the cluster and switched over to a chip, mounted on the lower front right of the cluster. Another way to tell if a cluster has a chip or a plug without searching for a production date is to look at the back color of it: If it’s white then it has a plug, if it’s blue then it has a chip. If your car was made after 12/85, then use a tachometer from an 1987+ 325i.
- You will need to retain your original coding plug (or chip) for accuracy.
CHECK ENGINE LIGHT WIRING
The 325i’s engine management system has self-diagnosis capabilities and therefore has a Check Engine light on the instrument cluster. For this, you’ll need the display on the lower left side of the instrument cluster (part number 62-11-1-381-497) as well as the wire that runs from the instrument cluster to the fusebox. It’s attached to the white cluster harness. I didn’t bother to wire the light.
Cooling System, Vacuum Lines, V-Belts
COOLING SYSTEM
The 325i uses a few different hoses for its cooling system than the 325e. If you have a 1984-1987 325e, use the cooling hoses from a 1987 325i because starting with the 1988 model year, BMW completely changed the cooling system and shifted the expansion tank over to the driver side (causing many hose changes). If you have a 1988 325 (Super Eta), then lucky you, you don’t need any modifications.
The coolant hoses you’ll need are:
- Expansion tank to water pump
- Expansion tank to radiator
- Expansion tank overflow
- Water pump to thermostat housing
- Thermostat housing to upper radiator
- Thermostat housing to lower radiator
- Thermostat housing to throttle body
- Thermostat housing to heater core
- Heater core to cylinder head
- Throttle body to block
VACUUM LINES
The only vacuum lines that you need that hasn’t been mentioned before are the valve cover breather hose, the idle control valve hose (to throttle body), and the dual brake booster hoses (from the brake booster to the throttle body). You don’t need the 325i brake booster, but if you have one then you may as well use it. The only difference between the two is the location of the vacuum port: On the “e” it’s on the passenger side of the booster while on most “i” models it’s on the driver side. The dual hoses from the throttle body will bend around the brake resevoir and fit fine in the 325e’s booster. You’ll also need the line from the fuel pressure regulator to the intake manifold, but it’s the exact same from the 325e. I actually used a Mercedes hose (oh, the horror!) since neither my local dealer nor my parts supplier had it in stock.
A/C, ALTERNATOR, POWER STEERING BELTS
From here, all you should need to reconnect are the power steering pump, alternator, air conditioner compressor, and the drive belts. Mount the power steering pump first and connect the three lines (two from the reservoir and one from the rack). Don’t forget the adjustment bracket. Next mount the alternator above it, wire the positive and negative connectors from the wiring harness, and mount the bracket to the lower timing cover. The A/C compressor mounts similarly, and tighten the two plugs with a 19mm and 22mm wrench. The first V-belt that you’ll have to mount is the alternator/water pump belt. The belt that’s supposed to be used is the 10×965, but that was way too loose so I ended up using a 10×950 which fit perfectly. Mount the A/C belt second, then the power steering third. The A/C belt is an absolute pain to put on, so a trick is to mount the belt on the A/C pulley as much as you can, then use a pick or flathead screwdriver to hold it in place. Have a friend quickly crank the car (in Neutral or Park, of course!) for less than a second and the belt will snap into place, but you gotta remove the tool fast when it cranks.
Spin the fan clutch on (another trick is to hold it in place and quickly crank the car until it catches), then tighten the four bolts down using the special fan clutch tool, which locks the pulley on place.
Now, the car should be all ready to start. Check, double check, and triple check ALL the wiring and hose connections, and make sure that all hose clamps are nice and tight.
Once that’s done, add oil to the crankcase if you haven’t already done so. After it’s filled, DISCONNECT the ignition coil so the car won’t start (if you haven’t already). Crank the car for 5-8 seconds, then stop. Repeat the process until the oil pressure light is off; it may take several times for this to happen. Don’t overcrank the car because you’ll burn the starter. When the light goes off, it means that there is enough oil circulating in the engine where it won’t cause damage. Turn the key off, reconnect the coil, cross your fingers, and start the car.

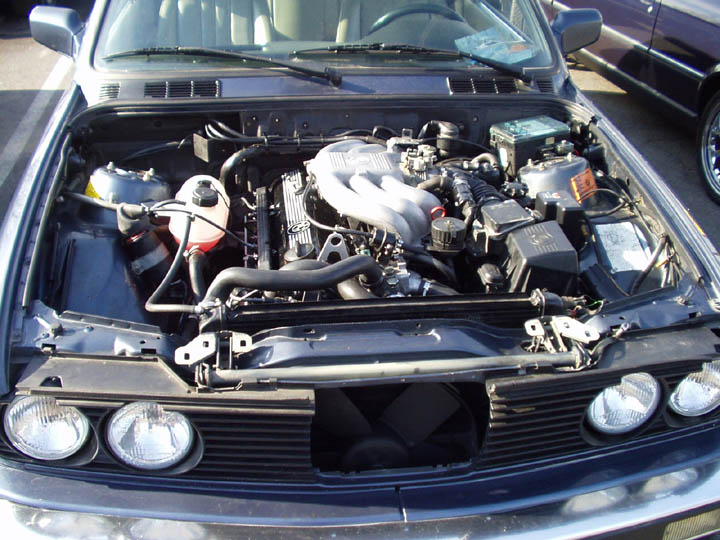

At 12:19 AM on January 2, 2003, the final check was done and the 2.8i conversion was finally complete.
It fired right up and sounded mean…very mean. After a few quick checks, it was time to bleed the cooling system.
Check again for any leaks or loose ends, then close it up and take it around the block for a spin! I kept the RPMs under 3000, but right from idle I could feel it pull stronger than ever before.
Software
Back in 2003, there was no software available since chip tuning was only done by a few companies globally and limited to stock engines. Custom chips, especially for modified stroker engines, simply didn’t exist so at the time so there were 3 options:
- Use the stock 325i chip. This will limit the potential of the conversion and will even cause a lean air/fuel mixture at higher RPM.
- Use a Jim Conforti/TMS 325i chip. This will advance the timing and give a power boost across RPMs, but doesn’t account for the change in air/fuel mixture and is marginally better than the stock chip.
- Use the Alpina B3 2.7 chip. In 2003 this was the best option since it was designed for Alpina’s version of a 327i, which was a 325i engine with a 325e crankshaft and connecting rods, Alpina pistons, higher compression ratio, Alpina camshaft, Alpina intake manifold and throttle body, and higher flow injectors.
I installed the B3 2.7 chip about 6 months after the conversion. While I didn’t notice any significant seat-of-the-pants power gain, it raised and stabilized the idle to 900 RPM and increased overall drivability vs. the stock 325i chip.
Power and Dyno Charts
Coming one day.
[8/2020:] But while you wait, one thing you should know is the power and torque curve of the 2.8i mirror a stock 325i but are bumped higher at all RPMs. This debunks the 1990s/early 2000s myth that the 327i or 328i is a hybrid of a high torque eta engine mixed with the high horsepower of a 325i motor. I even wrote this above in the FAQ, which was wrong. Instead, this conversion will result in a super 325i, and that’s a good thing.
Final Thoughts
After the initial 1000 mile break-in period, I was happy to report that the 328i has been running great without any problems. With the stock 2.93:1 differential, the car feels slightly faster than my old chipped eta off the line, but once it gets up to about 2500 it pulls much harder than a chipped 325is, which I also had as a reference. Just for fun, using a highly unscientific G-Tech to test the 0-60 on my car, I clocked a 6.65 second time with one passenger, clutch slipped at 2000 RPM, and shifts at somewhere around 5800 RPM.
About a month after the conversion I installed a 3.73 limited slip differential from a 325is, which is a direct bolt-on with no modifications required. The difference was night and day and the car accelerates like a bat out of hell with this gearing. Initially it seemed to rev too high on the freeway but I got used to it quickly, especially with the huge boost in acceleration. In hindsight, the conversion almost seems wasted with the 2.93:1 differential so I’m very glad I upgraded. After the differential upgrade the end result is almost officially a 325i that has high compression pistons and longer stroke.
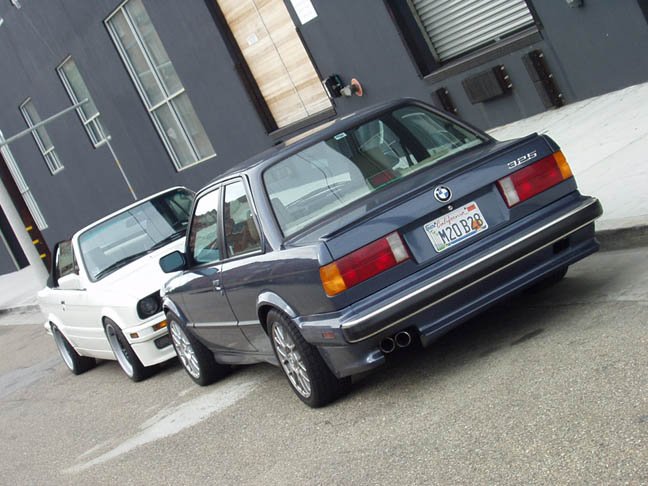
I also ordered a custom “M20 B28” plate to match the car since I thought it would be a nice addition. You can also add a “328i” badge from an E36 or the “2.8i” badge from the Z3 for a finishing touch.
The cost of the conversion and the amount of additional parts needed was much more than what I originally planned. The initial calculation was around $2,500 since all the labor (except the machine work) was done by myself and my co-workers, but I ended up spending almost $1,000 more on miscellaneous parts and on things that I found out were bad, like the starter.
However, unlike what many sources on the Internet described [note: this was written in 2003], things do not just bolt right in, and I couldn’t find anyone who could accurately describe what parts from an 325e could remain and what parts from an 325i had to be used. In the end there were so many 325i parts needed that using a 325i as a starting point would have been easier. In fact, the only eta-specific parts that I still used were the valve cover, connecting rods, and airbox (though you can and should reuse the eta crankshaft).
But I can say that it was a great learning experience and I am happy that this was the first time that anyone has ever documented a 325e to 325i M20 stroker engine build. But I couldn’t have done it without the assistance of Paul Ahumada and Can Chang, all of whom donated countless hours of their lives for this project. Special thanks to Terry Tinney, Marvin Ancheta, Barry Robinson, Rich Vijeh, Scott Miller, Eric Lukas, Dave Adams, Chris Dunagan, Tom Walrod, Eric Mickelson, Daniel from SSF, and to everyone else who helped me out with information, parts, and support!
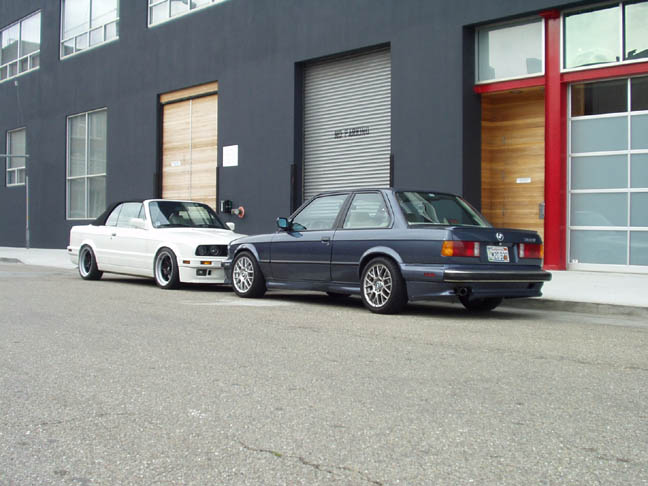
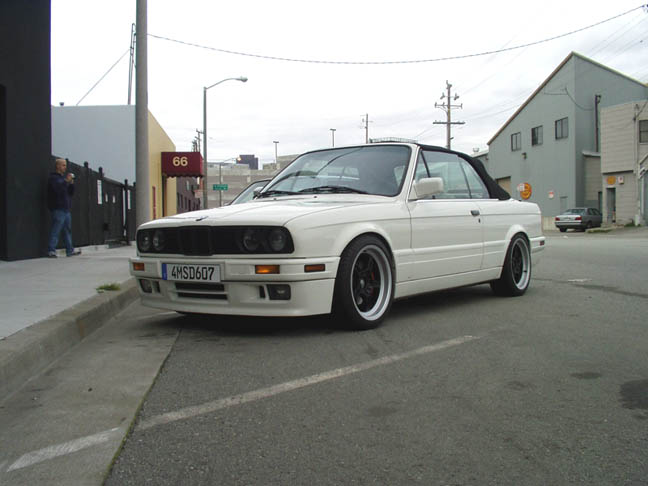
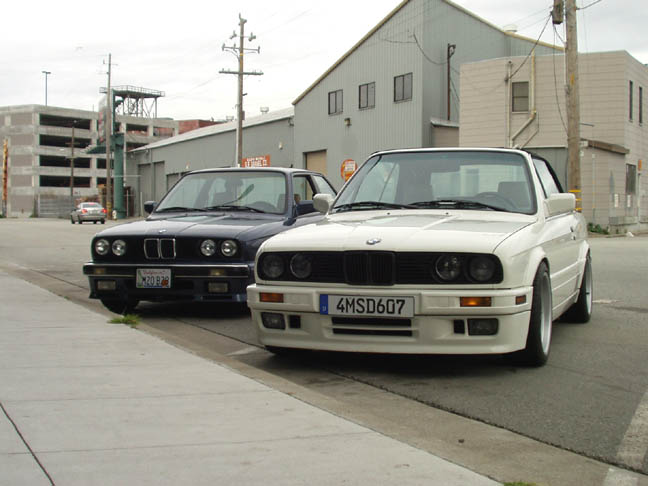
2.8i MEETS 3.0i
My friend Dave Adams also built a 3.0 liter M20 stroker out of his 1993 325i M-Technic 2 at the same time I was building my 2.8. We finished our cars at the same time and had a little meet afterwards. Dave’s 330iC was much more modified than mine (aside from the larger displacement, he also put on a Schrick 272 cam, oversize valves, ported intake manifold and throttle body, and MSDS headers, in addition to the mods he already has). It pulls significantly harder than mine at higher RPM, so if you see him in your rearview mirror, move over!

Unfortunately, as of October 2003 his 330iC was rear-ended by an inattentive driver on the Bay Bridge and was totaled out by the insurance. RIP.
